
📅 Published: May 2026 | ✍️ By Brad Andrews | ⏱️ 13 min read
I have not ventured into playing with e-ink displays before, and the more I have seen them on social forums and youtube, the more I wanted one. I started looking at what SeeedStudio had to offer and found the TRMNL 7.5″ DIY Kit which is around $50 USD and looked like a great option so in the cart and on my card it went.
While this model ships with its own TRMNL firmware requiring their software/ cloud services, it is ESP based so I started writing my own dashboard yaml to flash it when it arrived.
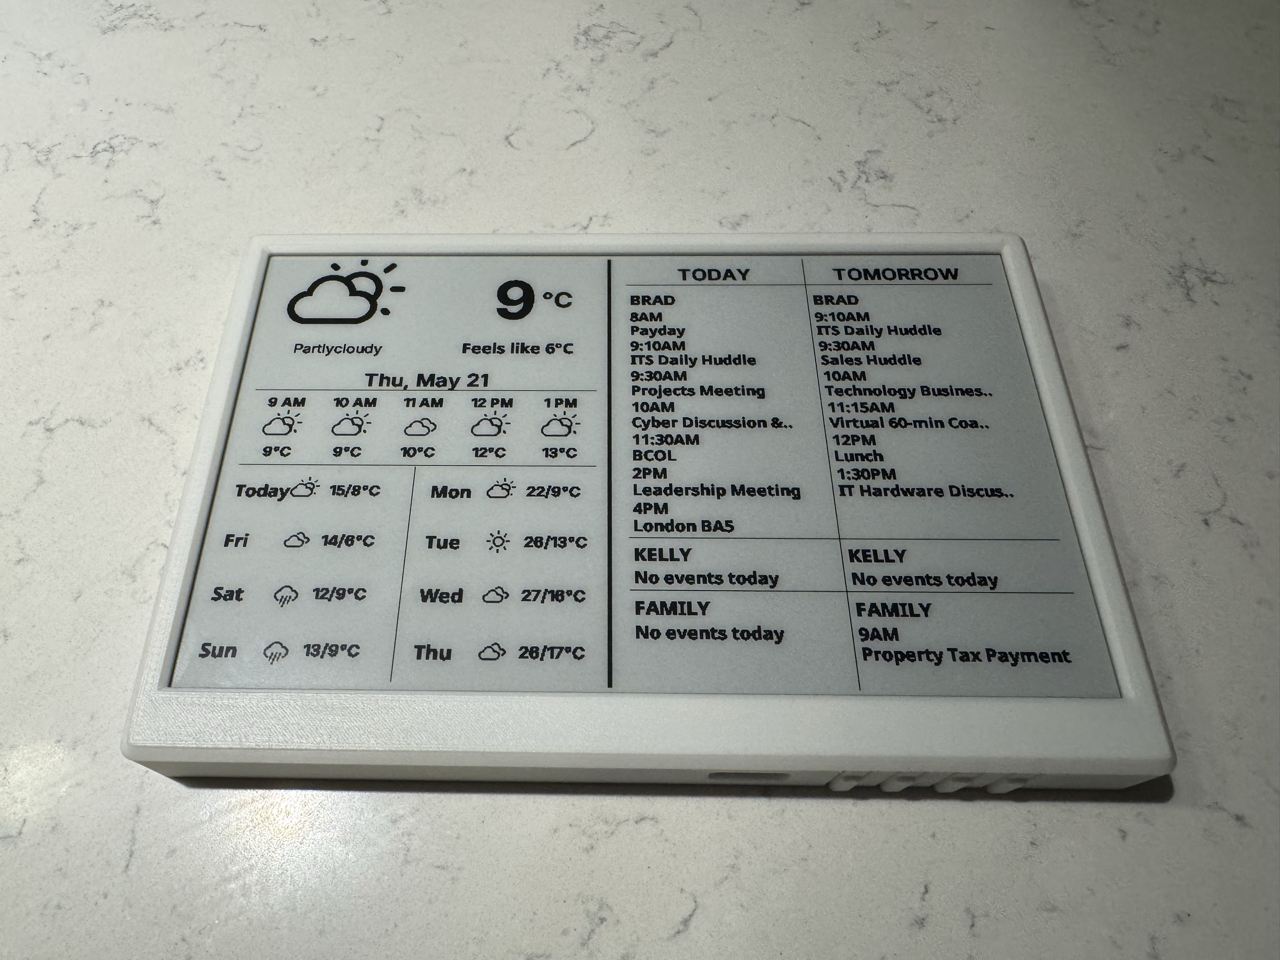
The idea here is very simple, when I wake up or my wife does, we can walk into the closet to get dressed and use the e-ink display to see weather for the day/ hourly and our calendars so we know what to wear and what the day looks like. I do have a messages dashboard that shows me this information too, but I wanted to glance at it without doing anything in the closet, which is where this fits great.
One thing to watch for, is the window when it boots to allow you to load its web interface and flash ESP can take a couple tries to hit. It took me 3 tries to catch it and once the web page loads it stays, and then it worked perfectly into ESPHome Builder from there on.
What the TRMNL OG DIY Kit Actually Is
Now you need to keep in mind, this is not a finished product. It is a DIY kit you get to build as you please with and 3D print one of their wall mount or desk stand enclosures for or make your own 3D printed enclosure. I choose their wall mount and had a good friend of mine with a 3D printer print it out for me. His name is Matthew and he is also a photographer and I highly recommended checking out his work here.
The panel in this kit is a 7.5″ Waveshare e-paper display which runs a resolution of 800 x 480 which is great, but the DPI is around 125 and it can be tough optimizing your fonts and sizes to display crisp lines mostly with text than icons but it did take some trial and error to get it right, just do not set your fonts too small.
In the end I am very happy with how it turned out and more importantly my wife really likes it too and its now become the first “tech” we use most mornings as we wake up and get ready.
The First Screen You See
When it boots up the first time, you will see this:
MAC not registered — send to support@trmnl.com to activate your TRMNL.
That message is just the firmware trying to check in with their service and not finding anything tied to your device, which makes sense if you are not using their platform.
Underneath that though, it is still just an ESP32‑S3, which is really what matters.
Once you flash ESPHome onto it, that message disappears and it stops trying to reach out at all. From there it just connects straight into Home Assistant and does what you tell it.
Which is what I was trying to get to in the first place.
Flashing ESPHome: The 9-Second Window
This is the part that takes a few tries.
The standard ESPHome first-flash process uses the web tool at web.esphome.io in Chrome or Edge. You connect the device via USB, the browser detects it as a serial port, and you flash a minimal base firmware that gets the device on your network. Every update after that goes over the air.
The catch with the TRMNL kit is that the TRMNL firmware does not expose a USB serial port during normal operation. The device simply does not show up when you plug it in.
The fix is the bootloader. Holding the B button while pressing and releasing R forces the ESP32-S3 into download mode, which does expose a serial port. But the TRMNL firmware also sleeps between refresh cycles. When it wakes, it checks for content and goes back to sleep. All within about 9 seconds.
So in practice: you have a short window after pressing Reset where the device is awake and in bootloader mode long enough for the web flasher to detect it. I missed it twice. On the third attempt I had the browser tab open and ready, pressed R, and clicked Connect immediately. It found the port and the flash completed before the window closed.
Once ESPHome is on the device, this is never an issue again. Every future update flashes wirelessly from the ESPHome dashboard in Home Assistant.
One thing that trips people up here: use a USB data cable, not a charge-only cable. Most USB-C cables are charge-only. If the device does not appear in your browser after the B + R sequence, swap the cable first. An Android phone cable or a USB hub accessory cable will work. An Apple charging brick cable will not.
The Core ESPHome Configuration
Once the device is adopted in Home Assistant’s ESPHome add-on, the full configuration takes over. The hardware block is the same for both layout variants described below:
yaml
spi:
  clk_pin:  GPIO7
  mosi_pin: GPIO9

display:
  - platform: waveshare_epaper
    id: epaper
    model: 7.50inv2
    cs_pin:    GPIO44
    dc_pin:    GPIO10
    reset_pin: GPIO38
    busy_pin:
      number:   GPIO4
      inverted: true
    update_interval: never
    lambda: |-
      // your drawing code here
The update_interval: never is intentional. E-paper panels have a finite number of full refresh cycles before performance degrades. Rather than refreshing on a timer inside ESPHome, an automation in Home Assistant presses the button entity every 15 minutes. This keeps the display current while the refresh decision stays in HA where it belongs.
The display refresh automation:
yaml
automation:
  - alias: "TRMNL - Refresh Display"
    id: trmnl_refresh_display
    mode: single
    trigger:
      - platform: time_pattern
        minutes: "/15"
      - platform: homeassistant
        event: start
    action:
      - delay: "00:00:30"
      - action: button.press
        target:
          entity_id: button.YOUR_ESPHOME_DEVICE_refresh_display
Replace YOUR_ESPHOME_DEVICE with your ESPHome device name slug. The 30-second delay gives the Home Assistant template sensors time to pull fresh data before the display renders.
When the ESPHome device reboots, whether from a firmware update or from pressing the physical RESET button, an on_client_connected hook in the ESPHome config triggers a refresh automatically after 20 seconds. So reboots self-heal without any manual intervention.
The Physical Buttons
The TRMNL OG kit has four buttons on the board: RESET, KEY1, KEY2, and KEY3.
RESET is a hardware reset. It cannot be reprogrammed. Pressing it reboots the ESP32, and the on_client_connected hook handles the display refresh about 20 seconds later once HA reconnects. Think of it as a “something is broken, recover” button.
KEY1, KEY2, and KEY3 are fully programmable. They connect to GPIO2, GPIO3, and GPIO5 respectively, are active-low, and pull HIGH when not pressed. In ESPHome:
yaml
binary_sensor:
  - platform: gpio
    pin:
      number: GPIO2
      mode: INPUT_PULLUP
      inverted: true
    internal: true
    on_press:
      - homeassistant.service:
          service: light.toggle
          data:
            entity_id: light.YOUR_CLOSET_LIGHT

  - platform: gpio
    pin:
      number: GPIO3
      mode: INPUT_PULLUP
      inverted: true
    internal: true
    on_press:
      - homeassistant.service:
          service: light.toggle
          data:
            entity_id: light.YOUR_CLOSET_LIGHT

  - platform: gpio
    pin:
      number: GPIO5
      mode: INPUT_PULLUP
      inverted: true
    internal: true
    on_press:
      - homeassistant.service:
          service: light.toggle
          data:
            entity_id: light.YOUR_CLOSET_LIGHT
In my setup, all three toggle the closet light. The reason is practical: the display is mounted in a walk-in closet, and I want to be able to hit a button without looking at which one it is. You could just as easily use KEY3 for a forced screen refresh, KEY2 for something else entirely, and KEY1 for the light. The homeassistant.service call supports any service HA exposes.
Replace light.YOUR_CLOSET_LIGHT with your own light entity ID from Developer Tools > States.
For a manual display refresh without rebooting, a template button entity is exposed to HA:
yaml
button:
  - platform: template
    name: "Refresh Display"
    on_press:
      - component.update: epaper
This shows up in HA as a pressable button entity. Useful for testing layouts or forcing a refresh after making changes.
A Note on the LEDs
The board has two LEDs. Worth knowing what they do and what you can do about them.
The red LED on the XIAO module is a power indicator. It is on when the board has power. Hardware-driven, always on.
The green LED is the battery charge indicator on the carrier board. It blinks when no battery is connected. When USB power is present and a battery is connected and charging, it goes solid green. When the battery is full, it goes off. I spent time trying to figure out if it could be disabled in software, including pulling the actual schematic PDF from Seeed’s wiki and reading through the power section.
The short answer: no. The green LED is wired directly to the STAT pin of the SY6974B charging IC through a resistor. There is no GPIO between the ESP32 and that LED. The charger IC drives it based on battery state, and there is nothing firmware can do to change that.
If you are installing this somewhere the LED would be annoying, your options are a small piece of black electrical tape over the LED, reflowing it off the PCB, or cutting the trace. All three are hardware mods rather than software ones.
The Data Pipeline: Home Assistant Template Sensors
The display draws from two data sources: OpenWeatherMap for weather, and Google Calendar for schedules. Neither feeds directly into ESPHome. Everything goes through Home Assistant template sensors that format the data into pipe-delimited strings the ESPHome C++ lambda can parse.
All sensors live in a single packages file at /config/packages/trmnl.yaml in your HA config directory. There are 21 sensors in total.
Weather sensors
The hourly forecast sensors follow this pattern:
yaml
template:
  - trigger:
      - platform: time_pattern
        minutes: "/15"
      - platform: homeassistant
        event: start
    action:
      - action: weather.get_forecasts
        target:
          entity_id: weather.YOUR_WEATHER_ENTITY
        data:
          type: hourly
        response_variable: hourly_resp
    sensor:
      - name: "TRMNL Hourly 1"
        unique_id: trmnl_hourly_1
        state: >-
          {% set fc = hourly_resp['weather.YOUR_WEATHER_ENTITY'].forecast %}
          {% if fc | length > 1 %}{{ (fc[1].datetime | as_datetime | as_local).strftime('%-I %p') }}|{{ fc[1].temperature | round(0) | int }}|{{ fc[1].condition }}{% else %}--|0|sunny{% endif %}
The state comes back as something like 2 PM|16|cloudy. ESPHome splits on the pipe character at render time.
Replace weather.YOUR_WEATHER_ENTITY with your weather integration entity ID, found under Developer Tools > States. OpenWeatherMap is what I use. Any integration that provides hourly forecast data through the weather.get_forecasts service will work.
One syntax note that catches people: in HA Jinja2 templates, strftime is a method call on a datetime object, not a pipe filter. The correct form is (datetime_object).strftime('format'). Using it as a filter will throw an error. Most examples online show the filter form. They are wrong.
Calendar sensors
Calendar events hit a 255-character limit if you try to put them all in the sensor state. The workaround is to put the count in the state and the actual event data in an attribute:
yaml
sensor:
  - name: "TRMNL Brad Today Events"
    unique_id: trmnl_brad_today_events
    state: >-
      {% set w = bw_today['calendar.YOUR_WORK_CALENDAR'].events | default([]) %}
      {% set p = bp_today['calendar.YOUR_PERSONAL_CALENDAR'].events | default([]) %}
      {{ (w + p) | length }} events
    attributes:
      events: >-
        {% set w = bw_today['calendar.YOUR_WORK_CALENDAR'].events | default([]) %}
        {% set p = bp_today['calendar.YOUR_PERSONAL_CALENDAR'].events | default([]) %}
        {% set all = (w + p) | sort(attribute='start') %}
        {% set ns = namespace(lines=[]) %}
        {% for e in all %}
          {% if 'T' in e.start %}
            {% set t1 = (e.start | as_datetime | as_local).strftime('%H:%M') %}
            {% set t2 = (e.end   | as_datetime | as_local).strftime('%H:%M') %}
          {% else %}
            {% set t1 = 'allday' %}{% set t2 = 'allday' %}
          {% endif %}
          {% set ns.lines = ns.lines + [t1 + '|' + t2 + '|' + e.summary] %}
        {% endfor %}
        {{ ns.lines | join('\n') }}
The 'T' in e.start check distinguishes all-day events from timed ones. All-day events come back as date strings without a T. Timed events come back as datetime strings that contain T. ESPHome reads the attribute with attribute: events on the text_sensor.
My setup pulls from three calendars for the Brad section: work, personal, and sports. All three are combined and sorted by start time. Kelly’s section pulls from her personal calendar. Family events that involve everyone show in the Family section. All six sensors (Brad today, Brad tomorrow, Kelly today, Kelly tomorrow, Family today, Family tomorrow) live in the same packages file.
Today sensors query from midnight (hour=0) rather than now(). That way, a meeting that started at 9 AM is still visible at 11 AM instead of disappearing from the display.
Choosing Your Layout
This is where the configuration splits into two variants. Both share the same hardware setup, the same button config, and the same HA sensor file. The only difference is what goes in the display lambda.
Choose the Agenda layout if:
- Your days are dense with timed events
- You want to see time relationships visually: what overlaps, what comes right after what
- You think in terms of a calendar grid more than a list
Choose the Box-list layout if:
- You have a household with multiple people’s schedules to track
- You care more about whose events they are than what time they start
- You have a mix of all-day and timed events that would look awkward on a time grid
- You want a simpler visual without coloured blocks and lane logic
Both show today and tomorrow in side-by-side columns. Both pull from the same six calendar sensors.
The Agenda Layout
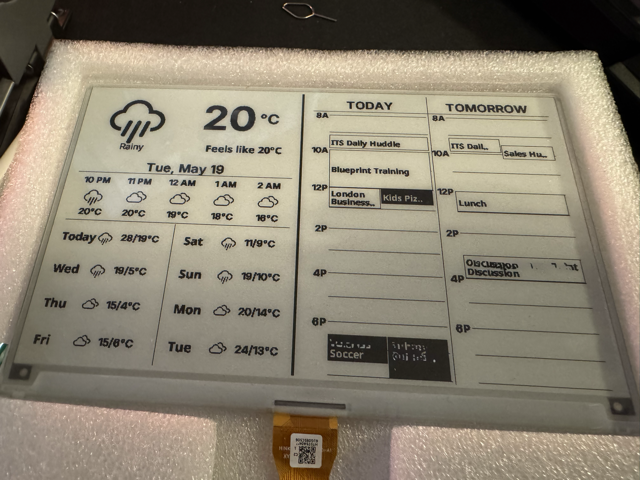
The Agenda view runs a time grid from 8 AM to 8 PM. Each event is drawn as a filled rectangle sized to its actual duration. Overlapping events are assigned to separate lanes, side by side, so nothing gets hidden underneath something else.
Events are colour-coded by owner. My events are white fill with a black outline and black text. Family events are solid black fill with white text. Kelly’s events get a double outline to distinguish them without adding a third fill pattern.
Short events, anything under about 45 minutes, get padded to a minimum visual height so the title stays readable. The event text wraps to two lines if the block is tall enough; otherwise it truncates.
This layout handles a busy calendar well. When Monday has seven meetings, you see exactly how jammed it is and where the gaps are.
The Box-list Layout
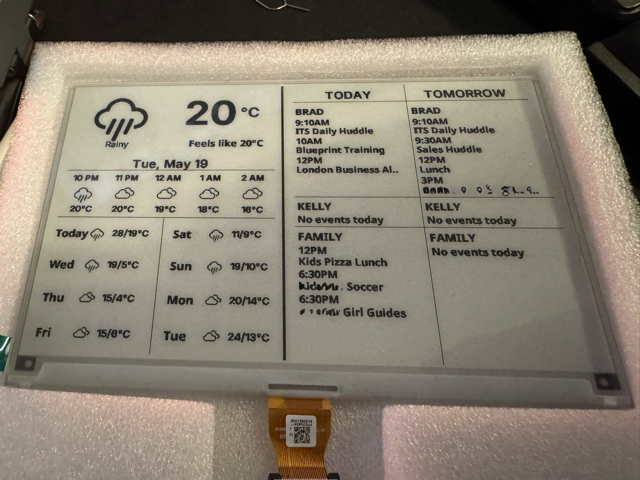
The Box-list view divides the right panel into three labelled sections: BRAD, KELLY, and FAMILY. Each column (Today and Tomorrow) shows the same three sections at the same vertical positions, so your eye knows where to look without scanning.
Section heights adapt based on how many events exist across both columns. If Brad has four events today and two tomorrow, the Brad section is tall enough to show four rows in both columns. This keeps the layout from shifting day to day.
Events show as two-line entries: start time on the first line, event title on the second. All-day events show All Day instead of a time. Long titles truncate with .. at the column edge.
My Brad section shows up to five events before adding a +N more overflow indicator. Kelly’s section shows up to two. Family shows up to three. This reflects how each calendar actually gets used. Brad has a lot of work meetings, Kelly’s personal calendar is lighter, and the Family calendar only carries actually-shared events.
Both layouts handle the same “No events today” placeholder when a section is empty.
Fonts at 125 DPI
This section is the part of the project that took the most iteration and produced the most learning.
At 125 DPI, the display is not going to look like a Kindle. The Paperwhite runs at 300 DPI. That gap is visible and it shapes every font decision.
After testing several options, the combination that works best is Noto Sans Bold at 18 pixels for section labels and calendar titles, Inter Bold at 72 pixels for the large temperature number, and Inter SemiBold at 22 pixels for section headings. Adding bpp: 4 to font definitions enables 4-level grayscale anti-aliasing in ESPHome, which softens glyph edges even on the 1-bit display hardware.
Serif fonts look worse here, not better. The thin strokes that make a serif beautiful at 300 DPI become pixel noise at 125 DPI.
One thing that is not obvious from the ESPHome documentation: bpp:4 anti-aliasing works by blending the glyph colour against the background. If you set the text colour to Color(0, 0, 0), which on an e-paper display with ESPHome’s colour model means white, bpp:4 will blend white against white. Every pixel in the glyph’s bounding box goes white. You end up with a white rectangle instead of white text.
The fix is to declare a separate font with bpp: 1 for any white-text rendering. bpp:1 only draws the foreground pixels and leaves the background untouched. So your font stack ends up with pairs: font_small at bpp:4 for black text, font_small_inv at bpp:1 for white text on dark backgrounds. This is the Agenda layout’s approach for Family events drawn on black fill.
The weather icons come from the Weather Icons TTF font (Erik Flowers, GitHub). The glyphs sit in Unicode’s Private Use Area, so ESPHome references them as raw UTF-8 byte sequences. The font file needs to be downloaded and placed at config/esphome/fonts/ in your HA config directory before compiling.
Where It Lives
As I mentioned a few times already this lives in our walk in closet, and we placed it immediately beside our door when we walk in. I used a simply push pin in the drywall to hold it on the 3D printed wall mount and it is holding up great so far.
The bonus feature though that I now use almost daily are the programmable buttons on the bottom. There are 3 buttons you can program to run anything in Home Assistant and I use them to control the lights. Our closet light switch is actually outside the closet and if someone is asleep in our bed already, I want to ensure the closet door is closed before I turn on the light. Before I used my phone flashlist or the Home Assistant companion app, but now I use the display in almost a squeeze like fashion to toggle the light on and off. I programmed all 3 buttons for my case to be a toggle for the closet light so I did not have to look at which button it is, I can just grab top and bottom and get any of the 3 buttons in a squeeze like fashion to click it.
This has been working great for both myself and my wife and we probably use this everyday. For $50 you really cannot beat it, especially how useful it is. The best part is you do not need to build it yourself now, you can use my yaml if you wish to replicate this at home easily. We just may need to add another of these in our mudroom too, who knows?
Getting the Full Configuration
Three files make up the complete build. All are in the Smart Home Secrets GitHub repository:
trmnl_epaper_agenda.yaml: ESPHome config with the time-blocked Agenda layouttrmnl_epaper_boxlist.yaml: ESPHome config with the section-based Box-list layoutha_trmnl_sensors.yaml: Home Assistant template sensor package file (shared by both)
Both ESPHome files are ready to adopt. Swap in your device name, WiFi credentials, and entity IDs for your weather and calendar sources. The HA sensors file drops into a packages directory and works as-is once you replace the calendar entity IDs with your own.
Smart Home Secrets is reader-supported. We may earn a commission if you buy through our links.