📅 Published: May 2026 | ✍️ By Brad Andrews | ⏱️ 10 min read
I wrote a sort of mini-series on voice because it is such a popular topic. If you have not yet, you might want to first read Blueprint #7: Local Voice Control & Ditching Google Home for Piper, Whisper, and openWakeWord and/ or What Home Assistant Voice Handles Locally, and What Still Needs an AI to learn more about how and why I ditched Google and setup local voice to begin with.
It seems crazy to me, and probably to you too or else you wouldn’t be reading this right now, how timers work or do not really work between Home Assistant, Voice Assist PE, and Satellite1 to name a few. It seems so simple asking for a timer and having Home Assistant track it so that all speakers are aware when asked to add more time or how much time is left. Not seeing the timer visually either and having to just remember where you left your timer does not really seem smart at all. Plus when it goes off, what if you changed rooms or even floors of your home, maybe you even went outside or left forgetting about the timer. This is a real problem that seems so easy to solve, and I am going to show you how to make it just a little bit easier and more normal.
We have kids! Not in a bad way, just the normal beautiful chaos of a house with young kids. Kelly and I use timers while cooking, as any normal person probably does just about all the time. The kids are always negotiating for more play time or to delay bedtime by just 5 more minutes. I also use timers to remind myself to put down the work or automation tinkering and pick up the kids from school when I am working from home and able to go instead of the grandparents.
These are all normal use cases any family would have and expect to just work out of the box, so why don’t they?
The reason, whether you like it or not and I do not, is that Voice PE timers are handled internally in the firmware and just not exposed to Home Assistant. This is silly but just the way it is, and I am sure a future update at some point will change that. But we do not have to wait because of how open all of this is.
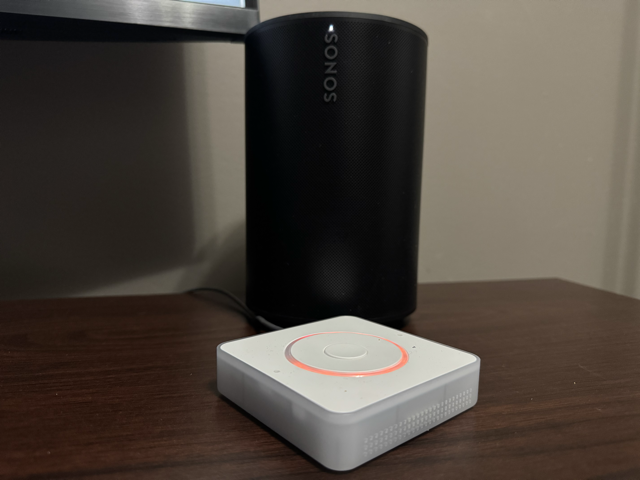
Let me show you how to update the YAML of your Voice PE or satellite speaker so you can expose the native timer into Home Assistant, then display it on your Home Assistant dashboards as an overlay like it should already do. It is quite easy and as mentioned requires a YAML update to the Voice PE and a few pretty simple automations, along with the Voice Satellite card from HACS.
Why the Voice PE Stores Timers Locally
Before getting into the fix, it is worth understanding why this limitation exists. The Voice PE runs ESPHome firmware. When you say “set a 10 minute timer,” the ESPHome voice assistant component handles it entirely on-device. No HA API call, no entity created, no event fired. The LED ring animation, the countdown, and the alarm chime are all managed locally by the firmware.
This is intentional. Local timer handling means timers work even when HA is unreachable or restarting. The tradeoff is HA stays completely out of the loop.
The upstream Voice PE package (github://esphome/home-assistant-voice-pe/home-assistant-voice.yaml) exposes two globals that track the active timer state: is_timer_active (a boolean) and first_active_timer (an object with seconds_left, total_seconds, and name). These globals are available inside ESPHome lambdas. We can read them on an interval and publish the values as HA sensors. That is the entire fix.
What We Are Building
Here is the full picture before we get into the YAML:
- Three ESPHome sensors on the Office VA expose timer state to HA: seconds left, total seconds, and timer name
- An automation watches for a timer to start, sets the LED ring to orange, and announces the timer name on the kitchen tablet
- An automation watches for the timer to finish, announces on both the Office VA and kitchen tablet, sends an iOS notification, and restores the LED ring
- A kitchen tablet automation handles timers set directly on the kitchen tablet, announces on completion, and notifies Brad’s iPhone
The LED ring on the Voice PE handles its own native countdown animation. We do not touch that. The orange colour indicates a timer is active on devices without a screen.
One design decision worth noting upfront: this setup mirrors Office VA timer activity to the kitchen tablet. That works well for cooking and household timers. For work-related timers set in the office, you might prefer those stay off the kitchen tablet. The customization section at the end covers how to control this.
Step 1: Expose the Voice PE Timer to Home Assistant
Open your Office VA device in ESPHome (Settings, then Add-ons, then ESPHome Device Builder, then Open Web UI). Replace your existing YAML with this:
Yaml example:
substitutions:
name: "brads-office-va"
friendly_name: Brads Office VA
packages:
Nabu Casa.Home Assistant Voice PE: github://esphome/home-assistant-voice-pe/home-assistant-voice.yaml
esphome:
name: ${name}
name_add_mac_suffix: false
friendly_name: ${friendly_name}
api:
encryption:
key: !secret esphome_api_key
esp32:
framework:
type: esp-idf
components:
- espressif/esp-nn==1.1.2
wifi:
ssid: !secret wifi_ssid
password: !secret wifi_password
micro_wake_word:
models:
- model: https://raw.githubusercontent.com/TaterTotterson/microWakeWords/refs/heads/main/microWakeWords/alexa.json
id: alexa
- model: https://raw.githubusercontent.com/TaterTotterson/microWakeWords/refs/heads/main/microWakeWordsV2/hey_cortana.json
id: hey_cortana
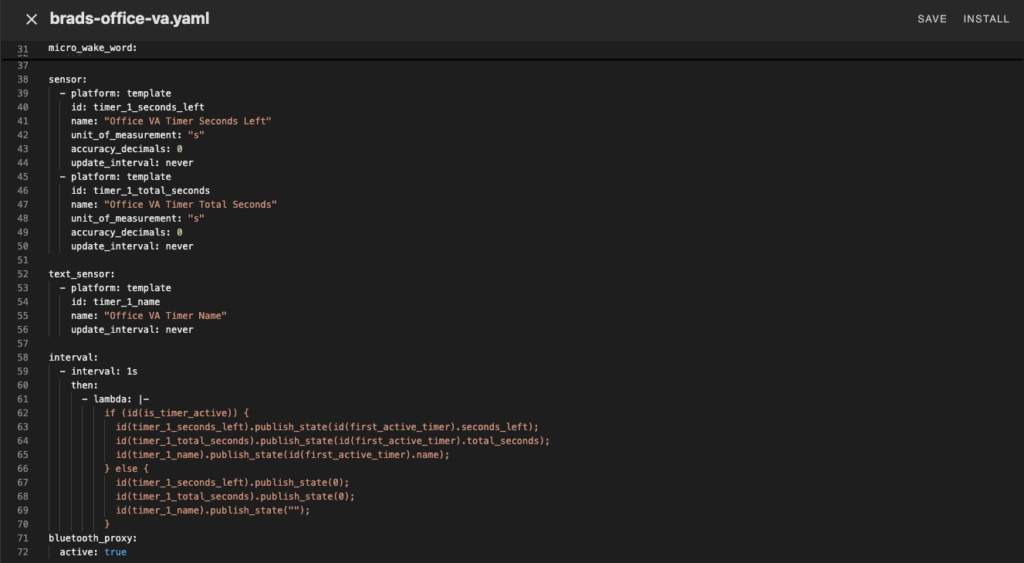
sensor:
- platform: template
id: timer_1_seconds_left
name: "Office VA Timer Seconds Left"
unit_of_measurement: "s"
accuracy_decimals: 0
update_interval: never
- platform: template
id: timer_1_total_seconds
name: "Office VA Timer Total Seconds"
unit_of_measurement: "s"
accuracy_decimals: 0
update_interval: never
text_sensor:
- platform: template
id: timer_1_name
name: "Office VA Timer Name"
update_interval: never
interval:
- interval: 1s
then:
- lambda: |-
if (id(is_timer_active)) {
id(timer_1_seconds_left).publish_state(id(first_active_timer).seconds_left);
id(timer_1_total_seconds).publish_state(id(first_active_timer).total_seconds);
id(timer_1_name).publish_state(id(first_active_timer).name);
} else {
id(timer_1_seconds_left).publish_state(0);
id(timer_1_total_seconds).publish_state(0);
id(timer_1_name).publish_state("");
}Save and install. The flash takes about 3-4 minutes over OTA.
A note on the component ID: Older documentation references voice_assistant_ha_voice as the internal component ID, but that ID is not accessible from outside the upstream package. The globals is_timer_active and first_active_timer are what the package exposes. Using the component ID directly will cause a compilation error.
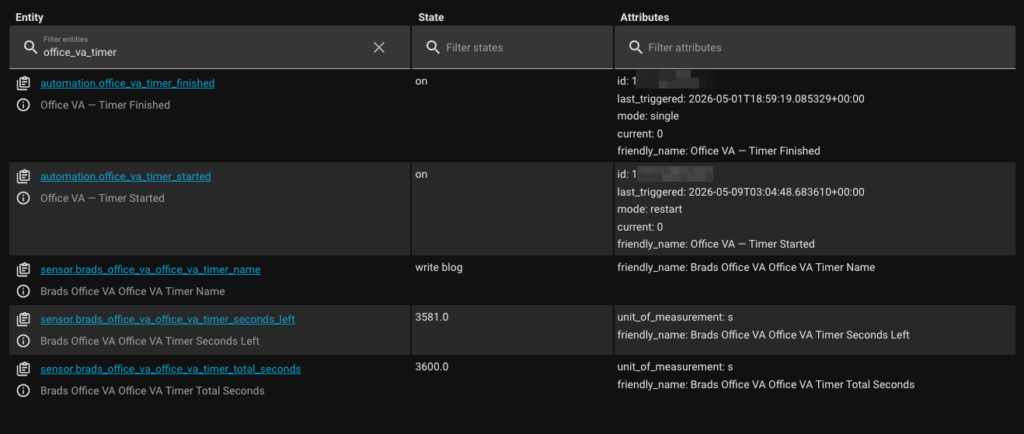
Once flashed, three new entities will appear in HA:
sensor.brads_office_va_office_va_timer_seconds_leftsensor.brads_office_va_office_va_timer_total_secondssensor.brads_office_va_office_va_timer_name
Set a timer on your Office VA and watch the sensors update in Developer Tools. When the timer is active, seconds_left counts down every second. When it finishes or is cancelled, all three sensors return to zero and empty.
Step 2: Timer Started Automation
This automation fires when a new timer is set on the Office VA. It waits 2 seconds for the name sensor to populate, sets the LED ring to orange, and announces the timer name on the kitchen tablet.
yaml
alias: Office VA Timer Started
description: >
  When the Office VA timer becomes active, sets the LED ring to orange
  and announces the timer name on the kitchen tablet.
mode: restart
trigger:
  - platform: numeric_state
    entity_id: sensor.YOUR_OFFICE_VA_TIMER_SECONDS_LEFT
    above: 0
action:
  - delay:
      seconds: 2
  - variables:
      timer_name: "{{ states('sensor.YOUR_OFFICE_VA_TIMER_NAME') | default('Timer') }}"
      timer_seconds: "{{ states('sensor.YOUR_OFFICE_VA_TIMER_SECONDS_LEFT') | int }}"
      timer_minutes: "{{ (states('sensor.YOUR_OFFICE_VA_TIMER_SECONDS_LEFT') | int // 60) % 60 }}"
      timer_hours: "{{ states('sensor.YOUR_OFFICE_VA_TIMER_SECONDS_LEFT') | int // 3600 }}"
  - parallel:
      - action: light.turn_on
        data:
          rgb_color: [255, 165, 0]
        target:
          entity_id: light.YOUR_OFFICE_VA_LED_RING
      - action: assist_satellite.announce
        data:
          message: >
            {{ timer_name }} timer started,
            {% if timer_hours | int > 0 %}{{ timer_hours }} hour{% if timer_hours | int > 1 %}s{% endif %}
            {% if timer_minutes | int > 0 %}and {{ timer_minutes }} minutes{% endif %}
            {% else %}{{ timer_minutes }} minutes{% endif %}.
        target:
          entity_id: assist_satellite.YOUR_KITCHEN_TABLET
Replace the following placeholders:
YOUR_OFFICE_VA_TIMER_SECONDS_LEFT: seconds left sensor entity ID from Step 1YOUR_OFFICE_VA_TIMER_NAME: timer name text sensor entity ID from Step 1YOUR_OFFICE_VA_LED_RING: found under Settings, then Devices, then your Office VA deviceYOUR_KITCHEN_TABLET: your kitchen tablet assist satellite entity ID
The 2-second delay before reading the name sensor is intentional. Without it the name sensor may still be empty when the automation fires, since the ESPHome interval publishes updates every second.
Step 3: Timer Finished Automation
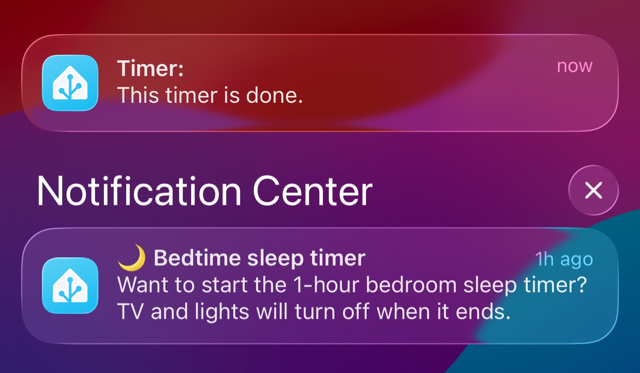
This automation fires when the timer reaches zero. It announces on both the Office VA and kitchen tablet, sends an iOS notification with the timer name in the title, and restores the LED ring to its previous colour.
yaml
alias: Office VA Timer Finished
description: >
  When the Office VA timer reaches zero, announces on the Office VA and
  kitchen tablet, sends iOS notification, and restores the LED ring.
mode: single
condition:
  - condition: numeric_state
    entity_id: sensor.YOUR_OFFICE_VA_TIMER_TOTAL_SECONDS
    above: 0
trigger:
  - platform: numeric_state
    entity_id: sensor.YOUR_OFFICE_VA_TIMER_SECONDS_LEFT
    below: 1
action:
  - parallel:
      - action: assist_satellite.announce
        data:
          message: "{{ states('sensor.YOUR_OFFICE_VA_TIMER_NAME') | default('Timer') }} timer is done."
        target:
          entity_id: assist_satellite.YOUR_OFFICE_VA_SATELLITE
      - action: assist_satellite.announce
        data:
          message: "{{ states('sensor.YOUR_OFFICE_VA_TIMER_NAME') | default('Timer') }} timer is done."
        target:
          entity_id: assist_satellite.YOUR_KITCHEN_TABLET
      - action: notify.mobile_app_YOUR_PHONE
        data:
          title: "Timer: {{ states('sensor.YOUR_OFFICE_VA_TIMER_NAME') | default('Timer') }}"
          message: "{{ states('sensor.YOUR_OFFICE_VA_TIMER_NAME') | default('Timer') }} timer is done."
          data:
            push:
              sound: default
      - action: light.turn_on
        data:
          rgb_color: [25, 255, 121]
        target:
          entity_id: light.YOUR_OFFICE_VA_LED_RING
The condition checking total_seconds > 0 prevents false triggers at startup or when HA restarts while sensors are at zero. The LED ring restores to green. Adjust the rgb_color value if your default LED colour is different.
Replace the following placeholders:
YOUR_OFFICE_VA_TIMER_TOTAL_SECONDS: total seconds sensor entity IDYOUR_OFFICE_VA_TIMER_SECONDS_LEFT: seconds left sensor entity IDYOUR_OFFICE_VA_TIMER_NAME: timer name text sensor entity IDYOUR_OFFICE_VA_SATELLITE: your Office VA assist satellite entity IDYOUR_KITCHEN_TABLET: your kitchen tablet assist satellite entity IDYOUR_PHONE: your mobile app notify target, found under Settings then Companion App
Step 4: Kitchen Tablet Timer Finished Automation
Timers set directly on the kitchen tablet are handled separately. The Voice Satellite card fires a last_timer_event attribute change on the assist satellite entity when a timer finishes. This automation watches for that event and handles the announcement and notification.
yaml
alias: Kitchen Tablet Timer Finished
description: >
  When a timer finishes on the kitchen tablet, announces on the tablet
  and sends an iOS notification.
mode: queued
max: 5
trigger:
  - platform: state
    entity_id: assist_satellite.YOUR_KITCHEN_TABLET
    attribute: last_timer_event
condition:
  - condition: template
    value_template: >
      {{ trigger.to_state.attributes.get('last_timer_event', {}).get('event_type') == 'timer_finished' }}
action:
  - variables:
      timer_name: >
        {{ trigger.to_state.attributes.get('last_timer_event', {}).get('name', 'Timer') }}
  - parallel:
      - action: assist_satellite.announce
        data:
          message: "{{ timer_name }} timer is done."
        target:
          entity_id: assist_satellite.YOUR_KITCHEN_TABLET
      - action: notify.mobile_app_YOUR_PHONE
        data:
          title: "Timer: {{ timer_name }}"
          message: "{{ timer_name }} timer is done."
          data:
            push:
              sound: default
Mode is set to queued with a max of 5 so multiple timers finishing close together are not dropped.
How Natural Speech Works With This Setup
The ESPHome sensors expose whatever the Voice PE’s native timer firmware creates. Speak naturally and the sensors reflect it accurately:
- “Set a timer for 10 minutes”: name sensor will be empty, defaults to “Timer”
- “Set a timer for 10 minutes for pasta”: name sensor shows “pasta”
- “Set a timer for 1 hour and 12 minutes for picking up the kids”: works exactly as you would expect
The LED ring handles its own native countdown animation independently. The orange colour sits on top of that during the timer period and restores when it finishes.
Customizing When and Where Timers Show
The setup above mirrors all Office VA timer activity to the kitchen tablet. That works well for cooking and household use. For work-related timers in a home office, you might prefer those stay local.
The easiest way to control this is to add a condition to the Timer Started automation. Check either the time of day or a helper you toggle manually:
Option 1: Time of day condition. Only mirror to the kitchen tablet during kitchen hours, like 7am to 9pm:
yaml
condition:
  - condition: time
    after: "07:00:00"
    before: "21:00:00"
Option 2: Input boolean toggle. Create an input_boolean.mirror_office_timers helper and add it as a condition. Toggle it off when you want office timers to stay private:
yaml
condition:
  - condition: state
    entity_id: input_boolean.YOUR_MIRROR_TIMERS_TOGGLE
    state: "on"
Replace YOUR_MIRROR_TIMERS_TOGGLE with your input boolean entity ID. The same condition can be added to the Timer Finished announcement for the kitchen tablet if you want consistent behaviour. The iOS notification will still fire regardless since that is personal to your phone.
The same principle applies if you add more Voice PE devices later. Each satellite gets its own sensors and its own started/finished automations. You decide per-device which tablet displays it, which speakers announce it, and who gets notified.
Honest Limitations
This setup works. It is not as polished as it should be, and that is worth saying plainly.
Voice PE timers should be natively exposed to HA without requiring ESPHome YAML changes and a firmware flash. The current architecture isolates timers per-device by default, which goes against the idea of a unified smart home. I expect this to improve as the Voice chapter continues to mature.
A few specific rough edges worth knowing:
One timer per Voice PE. The ESPHome globals only expose the first active timer. If you set two timers on the same PE, only the first is visible in HA. The PE itself handles both and you will hear both alarms, but the sensors only reflect one.
Cancel does not sync bidirectionally. Cancelling by voice on the PE does not trigger any HA event. Cancelling on the kitchen tablet does not cancel the PE timer. They are independent. This is a known limitation with an open path to a fix involving a custom ESPHome service, which may be covered in a future article.
Sensor delay. The interval updates every second. There is up to a one-second lag between the PE timer state and what HA sees. For practical use this is imperceptible, but worth knowing if you build anything timing-sensitive on top of these sensors.
For most households these limitations are acceptable. Timers are visible, notifications fire, and the kitchen tablet shows a countdown. That is a meaningful improvement over a timer that lives and dies on one piece of hardware.
What Is Next
This series has one more article left to share with you. Once you have local voice handling broadcast and timers, I want to show you how I setup my conversation agent. What I used in the pre-prompt, why the script description field matters more than the system prompt for tool selection, and how to write rules that Claude or any agent will follow more reliably.
Remember, you may want to read Blueprint #7: Local Voice Control & Ditching Google Home for Piper, Whisper, and openWakeWord and/ or What Home Assistant Voice Handles Locally, and What Still Needs an AI if you have not already to learn even more about my local voice journey before I fine tuned my Home Assistant Voice PE Timers.
That will be Article 3 of my mini-voice series. Like and follow on facebook to get notified when I publish it.