
📅 Published: March 2026 | ✍️ By Brad Andrews | ⏱️ 15 min read

I Was Skeptical Too, Here’s What Changed My Mind
Let me be straight with you: I’m an IT professional with over 15 years in infrastructure and cybersecurity. I’ve built and secured networks for businesses of all sizes, and I’ve been automating things at home long before “smart home” was a marketing category. I ran Leviton, then Vera, then landed on Homeseer, a solid Windows-based platform that felt like the right call for a Microsoft-certified guy like me.
Then someone pointed me toward Home Assistant. I spun it up, took one look at YAML configuration files, and shut it back down inside an hour.
YAML? Seriously? That’s how I’m supposed to manage my entire home?
I stayed on Homeseer for a while longer. But the cracks were showing, the development pace was sluggish, the mobile apps were genuinely painful to use, the UI looked like it hadn’t been touched in years, and the community was quietly shrinking. It wasn’t broken. It was just stuck.
Then Lovelace dropped.
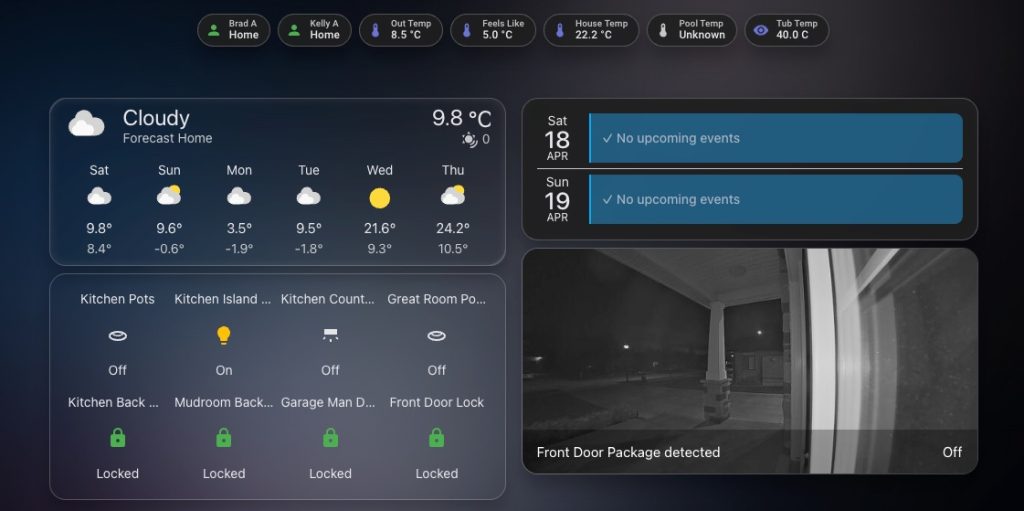
Lovelace was Home Assistant’s redesigned front-end, a fully customizable, card-based dashboard that made everything visual, intuitive, and actually enjoyable. That was the moment I went back in. This time, I stayed.
I migrated my entire setup over a single weekend. I used the Homeseer integration to bridge both platforms temporarily, and within a couple of hours everything was running natively in Home Assistant. The next morning, I shut Homeseer down permanently.
I went from 50–60 automations to over 200. Devices I’d forgotten I owned were auto-discovered before I’d finished my coffee. Things I never thought to automate suddenly became obvious.
If you’re sitting where I was, comfortable enough with what you have, worried about the learning curve, staring at YAML like it’s a foreign language, this Blueprint is for you.
Here’s the truth: it’s easier than you think, and you’ll never look back.
What Is Home Assistant, and Why Does It Matter?
Home Assistant (HA) is free, open-source software that acts as the central brain of your smart home. It runs locally on your own hardware, which means three things that matter enormously:
- Your automations fire even when your internet goes down
- No company is watching what happens inside your house
- No subscription fees. No vendor lock-in. No one can pull the plug on your setup
Every major ecosystem, Google Home, Amazon Alexa, Apple HomeKit, is a walled garden designed to keep you buying their products and dependent on their cloud. Home Assistant is the door out of all of them.
With over 3,000 integrations and a development community that ships new features faster than any proprietary platform on the market, HA connects everything: Philips Hue, Nest, Tesla, Sonos, Zigbee, Z-Wave, IP cameras, energy monitors, calendars, and things you haven’t thought of yet.
Source: Home Assistant Integration Directory, 3,000+ integrations, community-maintained and constantly growing.
What You’ll Need Before You Start
You don’t need to be a developer. and you do not need to enjoy or even know YAML (I certainly didn’t like it at first). You need the right hardware and an afternoon.
Hardware Options
Option 1: Home Assistant Green (~$99 USD), Best for Beginners Plug-and-play. Built specifically for Home Assistant OS. Comes pre-configured. Plug it in, open a browser, done. If I were starting today this is exactly what I’d buy.
Option 2: Raspberry Pi 4 (2GB or 4GB), Budget Option More tinkering required, but lower cost and highly flexible. Use a Samsung PRO Endurance microSD, standard cards burn out fast under constant read/write load.
Option 3: Used Mini PC (Intel NUC, Beelink, etc.), Power User Path Faster, more storage, handles large setups with ease. $80–$150 used. Where most serious HA users eventually land.
All options require:
- Wired Ethernet (Wi-Fi works, wired is significantly more reliable)
- A second device for initial setup
Step 1: Install Home Assistant OS
Home Assistant OS (HAOS) is the recommended installation for beginners. It handles updates automatically and unlocks the full Add-on ecosystem.
- Download the image for your hardware at home-assistant.io/installation
- Flash it to your storage using Balena Etcher, free, takes 5 minutes
- Boot your hardware from the flashed device
- On another device, open a browser and go to:
http://homeassistant.local:8123
If that doesn’t resolve, find your device’s IP from your router admin panel:
http://[YOUR-IP-ADDRESS]:8123
- Complete the onboarding wizard, set your name, location, and timezone
Insider Tip: Set your timezone correctly during setup. Home Assistant calculates sunrise and sunset based on it, and a wrong timezone is one of the most common reasons beginner automations misfires. Ask me how I know.
Step 2: Add Your First Integration
Home Assistant connects to devices through integrations. Most devices on your network will be auto-discovered the moment HA boots, this genuinely surprised me during my migration. Devices I’d half-forgotten about were sitting there waiting.
To add an integration manually:
- Settings → Devices & Services → Add Integration
- Search for your device brand
- Follow the prompts
Don’t skip this: After adding integrations, go to Settings → Areas and assign every device to a room. Takes 10 minutes. Makes every automation and dashboard you build from here dramatically easier to read and manage.
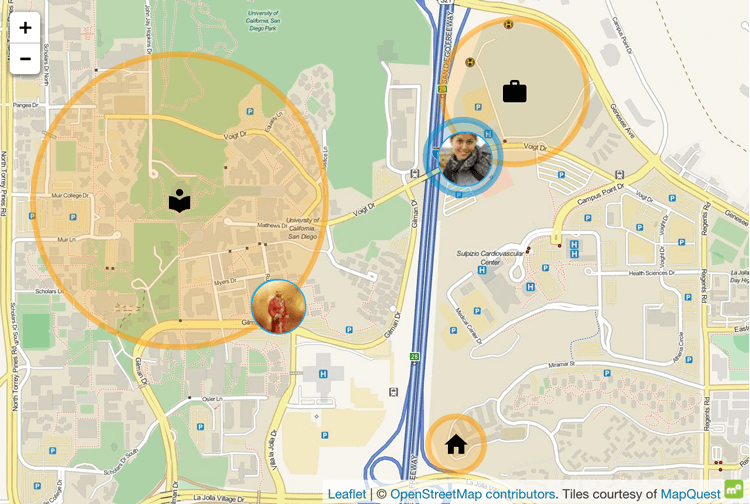
Step 3: Set Up Your Home Zone (Geofencing)
This is the step most beginner guides skip, and it’s one of the most powerful things you can set up on day one.
Home Assistant uses zones to know where people are. Your home zone is created automatically during setup, but you should verify it and understand how it works before building any presence-based automations.
Navigate to Settings → Areas & Zones → Zones to see your home zone. By default it uses a 100-metre radius around the coordinates you set during onboarding.
Here’s what that looks like in your configuration.yaml if you ever want to define zones manually:
zone:
  - name: Home
    latitude: !secret home_latitude
    longitude: !secret home_longitude
    radius: 100
    icon: mdi:home

  - name: Work
    latitude: !secret work_latitude
    longitude: !secret work_longitude
    radius: 75
    icon: mdi:briefcase

  - name: School
    latitude: !secret school_latitude
    longitude: !secret school_longitude
    radius: 100
    icon: mdi:school
I started with the default home zone and it worked fine. Within a few days I added work and school zones for the whole family, and that’s when presence-based automations really opened up. Knowing when the kids arrive at school, when my wife leaves work, when I’m heading home, all of that becomes available as automation triggers.
A full deep-dive on zones, geofencing, and family presence detection is coming in Blueprint #2: Setting Up Zones, Home, Work & School →
Step 4: Install the Mobile App
Download the Home Assistant Companion App (iOS or Android) and log in.
This is what connects your phone to your smart home:
- Your phone becomes a presence sensor, HA knows when you’re home
- Push notifications from automations land on your phone
- Dozens of phone sensors become available: battery level, Wi-Fi network, activity state, step count, and more
Once installed, you can build your first presence-based automation:
alias: "Welcome Home - Hallway Lights"
description: "Turn on hallway light when arriving home after sunset"
trigger:
  - platform: state
    entity_id: device_tracker.your_phone
    to: "home"
condition:
  - condition: sun
    after: sunset
action:
  - service: light.turn_on
    target:
      entity_id: light.hallway
    data:
      brightness_pct: 80
      transition: 2
mode: single
Replace device_tracker.your_phone with your actual device tracker entity and light.hallway with your light. That’s your first real automation, and it fires automatically, every time, without you touching anything.
Step 5: Build Your First Automation
Presence is one trigger. But automations can fire from almost anything. Head to Settings → Automations & Scenes → Create Automation.
Every automation has three parts:
| Part | What It Does | Example |
|---|---|---|
| Trigger | What starts it | Sunset, person arrives home, button pressed |
| Condition | Optional filter | Only on weekdays, only if no one is home |
| Action | What happens | Turn on lights, send notification, run a script |
Here’s a practical example, turning off all lights when the last person leaves home:
alias: "Everyone Left - Turn Off All Lights"
description: "Turn off all lights when the house is empty"
trigger:
  - platform: state
    entity_id: group.all_people
    to: "not_home"
condition: []
action:
  - service: light.turn_off
    target:
      area_id: all
mode: single
This is exactly the kind of automation that feels like magic the first time it works, and it’s maybe 10 lines of YAML.
Step 6: Essential Add-Ons
Navigate to Settings → Add-ons to find the Add-on Store, software that runs alongside Home Assistant and extends what it can do.
Install these immediately:
- File Editor, Edit your config files directly in the browser. You’ll need this.
- Studio Code Server, A full VS Code editor in your browser. For when File Editor isn’t enough.
- Advanced SSH & Web Terminal, Command-line access. Not required on day one, but you’ll want it eventually.
Step 7: Your First YAML Configuration
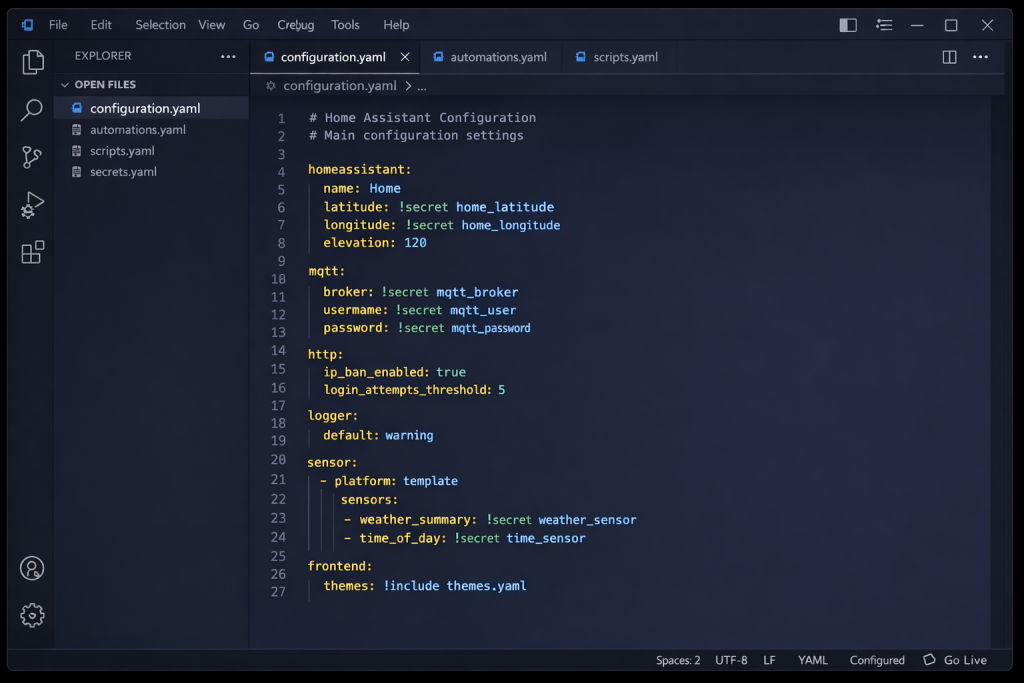
Most things in modern HA are configured through the UI, but configuration.yaml is where the real power lives. Here’s a clean, commented starting point:
# configuration.yaml

homeassistant:
  name: My Home
  latitude: !secret home_latitude
  longitude: !secret home_longitude
  elevation: 250
  unit_system: metric
  time_zone: America/Toronto
  currency: CAD

# Load default integrations
default_config:

# Text to speech
tts:
  - platform: google_translate

# Keep logs clean, change to 'debug' when troubleshooting
logger:
  default: warning
Store sensitive values in secrets.yaml:
# secrets.yaml, never share this file
home_latitude: 43.0000
home_longitude: -81.0000
work_latitude: 43.0100
work_longitude: -81.0100
school_latitude: 43.0200
school_longitude: -81.0200
Insider Tip: Using
!secretfor coordinates and API keys is a habit worth building from day one. It means you can share your config files, post them in forums, or back them up to GitHub without accidentally exposing your home location or credentials.
Step 8: Go Beyond With HACS
The official Add-on store is great. But the real game-changer is HACS, the Home Assistant Community Store.
HACS gives you access to thousands of community-built integrations, custom dashboard cards, and themes that aren’t in the official store. This is where Home Assistant goes from impressive to extraordinary.
Some of what I run from HACS that I genuinely couldn’t live without:
- Button Card, The most powerful custom card in the HA ecosystem. Fully scriptable buttons with dynamic styling. 226,000+ installs, there’s a reason for that.
- Bubble Card, Beautiful, modern UI cards with built-in popup support. My daily dashboard runs almost entirely on Bubble Card. Tap the weather section, get a full hourly forecast popup. Tap a room, get device controls.
- Weather Forecast Card, A proper visual forecast card. Everyone plans their day around the weather, this makes it actually readable on a dashboard.
- Team Tracker, Real-time sports scores and schedules in Home Assistant. I’m a Leafs fan, which means I suffer, but at least the Blue Jays give me something to celebrate. Automate your lights to flash your team colours when they score.
- Remote Calendar, Sync Google Calendar, iCal, or any external calendar directly into HA. My entire family’s schedule, work, school, personal, Kelly’s teaching calendar, all feeds into automations and our daily briefing dashboard.
HACS is powerful, but it requires care. You’re installing community code, not everything is vetted. A full guide on installing HACS safely, verifying sources, and what to look for before installing anything is coming in Blueprint #3: HACS, Unlocking the Community Store (And Staying Safe) →

What Surprised Me Most
When I committed to the migration from Homeseer, I expected weeks of pain. What I got was a weekend project I should have done years earlier.
The auto-discovery genuinely blew me away. Devices I’d set up and half-forgotten appeared in Home Assistant before I’d even gone looking for them. My Z-Wave switches, Zigbee sensors, Tesla, Sonos, Nest, all detected and ready to configure.
The development pace is extraordinary. Major releases ship monthly. The platform I use today looks nothing like what I migrated to, in the best possible way.
And the community? The Home Assistant forums and r/homeassistant are genuinely helpful. Whatever you’re trying to build, someone has already solved a version of it and posted the YAML.
What’s Next in The Blueprint Series
You’ve installed the most powerful smart home platform available. Here’s where we go from here:
- Blueprint #2: Setting Up Zones, Home, Work & School → How to build a complete geofencing setup for your whole family and what automations it unlocks
- Blueprint #3: HACS, Unlocking the Community Store (And Staying Safe) → How to install HACS, verify sources, and add custom GitHub repositories without putting your system at risk
- Blueprint #4: The Essential Add-Ons & Cards Every HA User Needs → The full breakdown of what I actually run, and why
- Blueprint #5: Syncing Your Family’s Calendars Into Home Assistant → How to pull every calendar in your household into one place and use it to automate your life
The Bottom Line
I put this off longer than I should have. YAML looked scary. The migration seemed like too much work. Homeseer was good enough.
None of those concerns survived contact with the actual platform.
If you’re an IT person, a tinkerer, or just someone who’s tired of their smart home feeling like five apps duct-taped together, Home Assistant is the answer. The setup takes an afternoon. The payoff is a smart home that does exactly what you want, not what a corporation decided you should want.
Join the Network. Get the Blueprint. Unlock the Truth.
Don’t forget to check out How to Set Up Proton Mail and take back your online privacy
Sources
- Home Assistant Official Documentation, Installation, configuration reference, integration directory
- Home Assistant Community Forums, Community support and real-world automation examples
- Balena Etcher, Free flashing tool for HAOS installation
Smart Home Secrets is reader-supported. We may earn a commission if you buy through our links.