📅 Published: April 2026 | ✍️ By Brad Andrews | ⏱️ 9 min read
Your Backup Is Only Good If You Actually Set It Up
Reading about why backups matter is the easy part. This article is about doing it.
By the end of this guide you’ll have automatic daily Home Assistant backups running to at least two locations, one local, one offsite. That’s the minimum I’d recommend to anyone. It takes about 15 minutes to set up and then runs silently in the background forever.
I’ll walk through three paths in order of complexity: USB drive for beginners, Synology NFS share for those with a NAS, and Nabu Casa for cloud backup. I’ll also cover how to actually restore from a backup, because setting it up is only half the job.
Understanding What HA Backs Up
Before touching any settings, it helps to know what a Home Assistant backup actually contains.
A full backup includes your entire HA configuration, automations, scripts, scenes, dashboards, integrations, add-on data, and your Home Assistant database. It does not include your Z-Wave or Zigbee network state. That’s a separate backup process covered in Part 3 of this series.
Partial backups let you select specific add-ons or configuration folders. They’re useful for quick snapshots before making targeted changes, but for your regular scheduled backup you want full backups every time.
Option 1: USB Drive (The Starting Point)
If you’re running Home Assistant on a Raspberry Pi or dedicated device and have no NAS, a USB drive is your first backup destination. It’s not the most robust solution, but it’s dramatically better than having everything on a single SD card or SSD with no second copy.
What to buy: Stick to name brands. Kingston, SanDisk, Samsung. Avoid cheap unbranded drives. They tend to fail faster, and the last thing you want is a backup drive that dies quietly. I prefer all-metal casing over plastic, it’s only a small improvement in physical durability, but given that this drive is sitting in a box running 24/7 it’s worth the marginal upgrade.
Size: 32GB is plenty for most setups. If your backup files are growing large due to add-on data, 64GB gives you comfortable headroom.
Why USB over nothing: If your main drive fails, your USB drive almost certainly hasn’t, they’re different hardware failing at different rates. It’s not a perfect solution, but it breaks the single point of failure. Once you outgrow it, graduate to a NAS.
Setting Up USB as a Backup Location
- Plug your USB drive into your Home Assistant hardware
- Go to Settings → System → Storage
- Under Drives, your USB drive should appear, select Use as data disk if you want to move your data, or simply use it as a backup destination in the next step
- Go to Settings → System → Backup
- Select Add backup location and choose your USB drive
Option 2: Synology NAS via NFS Share (Recommended)
This is the setup I run. Home Assistant writes backups directly to my Synology NAS over the network using an NFS share. The NAS sits on my local network, is protected by RAID, and is a completely separate physical device from the machine running Home Assistant.
My Proxmox server is an Intel NUC with a single SSD. If that SSD dies, my Synology has every backup intact. That separation is the whole point.
Step 1: Create a Shared Folder on Your Synology
- Open Synology DSM and go to Control Panel → Shared Folder
- Click Create and name the folder. I use
homeassistant-backup - Leave encryption off unless you have a specific reason. HA backups are already encrypted with your backup password
- Click through and finish the wizard
Step 2: Enable NFS on Your Synology
- Go to Control Panel → File Services → NFS
- Check Enable NFS service and click Apply
Step 3: Add NFS Permissions to Your Shared Folder
- Go back to Control Panel → Shared Folder
- Select your new folder and click Edit
- Go to the NFS Permissions tab and click Create
- Set the following:
| Field | Value |
|---|---|
| Hostname or IP | The IP address of your Home Assistant instance |
| Privilege | Read/Write |
| Squash | No mapping |
| Security | sys |
| Async | Enabled |
| Allow sub-folders | Checked |
- Click OK and Apply
Step 4: Note Your NFS Path
The path format is: [your-NAS-IP]:/volume1/homeassistant-backup
Find your exact volume name in DSM under Storage Manager if you’re unsure, it’s usually volume1 but may differ depending on your setup.
Step 5: Add the NFS Share in Home Assistant
- Go to Settings → System → Backup
- Click the three-dot menu (⋮) in the top right and select Add backup location
- Choose Network storage (NFS)
- Enter your NAS IP and the share path
- Click Connect, HA will verify the connection
Once connected, you’ll see the NFS share listed as an available backup location. You can now select it in your backup schedule settings.
Option 3: Nabu Casa Cloud Backup
Nabu Casa is a subscription service ($6.50 USD/month or $65/year) that provides secure remote access to your Home Assistant and automatic encrypted cloud backups. It’s run by the team behind Home Assistant and directly funds the Open Home Foundation, the nonprofit behind HA development.
I use Cloudflare Tunnel with mTLS for my own remote access, but I subscribe to Nabu Casa regardless. The cloud backup alone is worth it, and supporting the project that makes all of this possible is something I’m happy to pay for.
Setting Up Nabu Casa Backup
- Subscribe at nabucasa.com if you haven’t already
- In Home Assistant, go to Settings → Home Assistant Cloud
- Sign in with your Nabu Casa account
- Once connected, go to Settings → System → Backup
- Your Nabu Casa cloud storage will appear as an available backup location
Cloud backups through Nabu Casa are end-to-end encrypted. Nabu Casa cannot access your backup data.
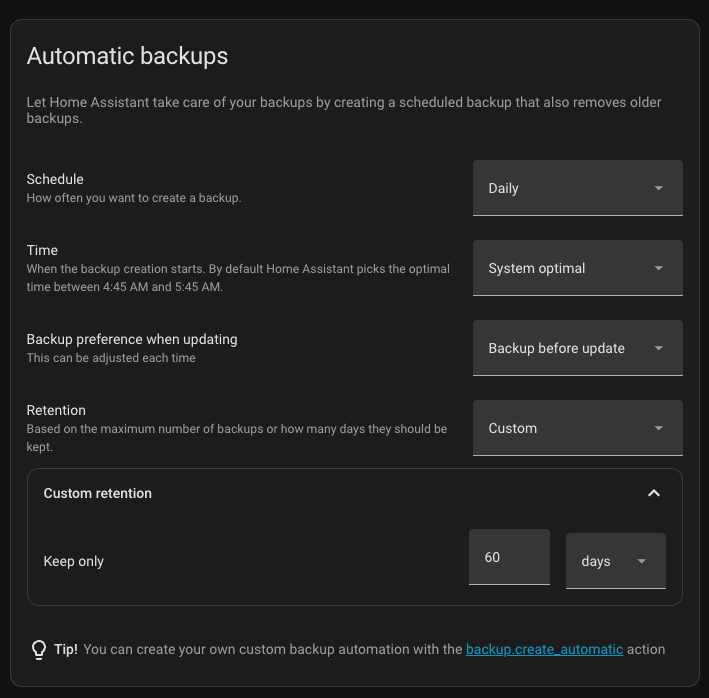
Configuring Your Backup Schedule
With your locations connected, set up automatic backups.
Go to Settings → System → Backup and tap Automatic backup schedule and retention.
My settings, and what I’d recommend:
| Setting | My Setup | Minimum Recommended |
|---|---|---|
| Frequency | Daily | Daily |
| Time | 5:11 AM | Any low-activity overnight time |
| Retention | 60 days | 14–30 days |
| Locations | NFS share + Nabu Casa | At least 2 locations |
On retention: 14 days is genuinely sufficient for most situations. When you need a restore, you almost always want either the backup from yesterday or the manual one you pulled before making changes. I keep 60 days because storage is cheap and it gives me options, but 30 days is a comfortable target for most setups.
The 5:11 AM time slot is deliberate. Activity in our house is low, automations are minimal, and the kids, assuming they’ve decided we’re allowed to sleep, aren’t likely to be triggering anything. Pick any overnight window that works for your setup.
Before You Make Changes: The Manual Backup Habit
Scheduled backups protect you from hardware failure and general disasters. They don’t protect you from yourself, at least not precisely enough.
Before making any significant change to your Home Assistant setup, updating a major integration, editing configuration files, adding or removing add-ons, restructuring your automations, pull a manual backup first.
Go to Settings → System → Backup and tap + Backup now.
This takes 30 seconds and gives you a clean restore point tied to exactly where your system was before you touched anything. I do this every time without exception. It has saved me more than once when I went a little deeper under the hood than I should have.
Name your manual backups clearly. Something like pre-update-2025-04-20 is infinitely more useful than Backup 47 when you’re trying to find the right one at 11pm with a broken system.
How to Restore From a Backup
Setup is only half the story. Let’s talk about what happens when you actually need to use it.
Scenario 1: HA Is Running, You Broke Something
This is the most common restore situation, you made a change, something broke, and you want to roll back. Home Assistant is still booting and accessible.
- Go to Settings → System → Backup
- Find the backup you want to restore, either your last automatic backup or the manual one you (hopefully) made before the change
- Tap the backup and select Restore
- Choose Full restore unless you only need to restore a specific component
- Confirm. HA will restart and restore to that point
I’ve done this after going a little too deep into configuration changes. The process is straightforward and it just works. Having a recent manual backup at that moment makes the difference between losing minutes of work and losing days.
Scenario 2: Fresh Install or Migration. Restore via Onboarding
When I moved Home Assistant from Synology Container Manager to Proxmox, I couldn’t use an NFS share as a backup source yet. Synology was still the host, and I needed it free to become the backup target. So before starting the migration I made a manual backup and downloaded it locally.
On the new Proxmox LXC install, when Home Assistant first boots and presents the onboarding wizard, there’s an option to restore from a backup before completing setup.
- On the onboarding screen, select Restore from backup
- Upload your backup file, the
.tarfile you downloaded from your previous instance - HA will restore your full configuration and continue setup
When the process finished I had a fully configured Home Assistant running on Proxmox, identical to what I’d been running on Synology. I then set up the NFS share pointing back to Synology, which was now free to be a dedicated backup target. Clean separation from that point forward.
Scenario 3: HA Won’t Boot at All
If your Home Assistant instance won’t start, you can still restore via the Home Assistant recovery mode.
- Access your device directly, via Proxmox console, SSH, or physical monitor
- Boot into Home Assistant recovery mode (available from the boot menu on HAOS installs)
- From recovery mode you can access the backup panel and restore without needing HA to be running
This is the path you’d take after a catastrophic storage failure where you’re rebuilding from scratch. The restore file can come from your NFS share or a downloaded backup from Nabu Casa.
Verifying Your Backups Are Working
Setting up backups is not the same as having working backups. Check these things regularly:
- Confirm the backup ran, the HA backup panel shows the last successful backup time and location. Glance at it once a week.
- Check your NAS, open your Synology shared folder occasionally and confirm backup files are appearing with recent timestamps
- Check Nabu Casa, your cloud backup count should be growing over time in the HA Cloud settings
A backup you’ve never verified is a backup you don’t actually have.
What’s Next in This Series
You’ve now got automatic daily backups running to two locations and know how to restore from them. That covers the core HA system. But there’s one critical piece most guides skip entirely.
Next up: Part 3. Don’t Forget Your Z-Wave Network, the backup that lives outside of Home Assistant entirely, and why a failed Z-Wave controller without it could mean resetting and re-pairing every device in your house.
Smart Home Secrets is reader-supported. We may earn a commission if you buy through our links.