📅 Published: April 2026 | ✍️ By Brad Andrews | ⏱️ 16 min read
When my Lenovo Smart Display finally died after several years of daily use, my first instinct was to find a replacement. Another smart display. Something familiar. I looked at what was available and kept running into the same problem: every option meant handing more control to Google, Amazon, or whoever else wanted a permanent presence on my kitchen counter.
I already had Home Assistant running across the house with close to 100 devices exposed to voice control. The answer was right there, a Home Assistant Display!
So instead of buying another smart display, I mounted a Samsung Galaxy Tab A9 on a stand and turned it into a fully local smart home control panel. Eight to ten months later, after starting to test Voice Satellite and Home Assistant Assist on the tablet, I hit a wall with the A9’s microphones. They simply weren’t up to the job. I found a Samsung Galaxy Tab S9 FE+ on clearance. It was larger, brighter, and had significantly better microphones. I made the switch. The A9 didn’t go to waste; it’s now running the same dashboard in the basement bar.
What I built ended up doing more than any smart display ever could, and it does most of it without touching the internet at all. This is the full story of how it works and how you can build your own.
Why a Tablet Beats a Smart Display
The Lenovo Smart Display was fine for what it was. Weather, timers, a bit of Google Assistant. However, it lived inside Google’s walled garden. My UniFi cameras had no integration with it. There was no way to customize which devices appeared on screen, and Google’s integrations only worked if your devices played by their rules. Forget chore tracking or energy monitoring. When it finally failed, I had no interest in replacing it with another Google display that wasn’t going to play nicely with the rest of my setup anyway.
A tablet running Home Assistant has none of those constraints. Because I control the software, I control what it shows, what it does, and how it behaves. Additionally, when the hardware eventually ages out, I replace the tablet, not the whole concept.
The Hardware
The current setup didn’t start as a two-tablet household. It started as a lesson in what actually matters when choosing hardware for a voice-enabled home assistant display.
When the Lenovo died, I replaced it with a Samsung Galaxy Tab A9. For most of those eight to ten months it served its purpose well as a home assistant display. Then I started experimenting with Voice Satellite and Home Assistant Assist on the tablet. That’s when the A9’s microphone limitations became impossible to ignore. Pickup was inconsistent from across the kitchen, and the experience wasn’t what I wanted from a device meant to replace a smart display entirely.
About six weeks ago I found a Samsung Galaxy Tab S9 FE+ on clearance. The S9 FE+ is noticeably larger, brighter, and has significantly better microphones: more of them, better placed, better quality. The difference in voice pickup was immediate. The A9 got reassigned to the basement bar, where it runs the same dashboard and stack, and where voice is useful but not the primary focus.
Kitchen stand: The S9 FE+ sits on an Aoviho height and angle adjustable stand. It holds the home assistant display solidly and lets me set the viewing angle once and forget it. No swivel, and honestly that’s the one thing I’d change. Now that Mealie meal planning is in the works and the tablet will get even more active daily use, a swivel would make it easier for anyone in the kitchen to pull it toward them. That upgrade is coming.
Basement stand: The A9 sits on a Lumicall swivel stand, which I picked up when making the move. The swivel is a nice bonus when browsing through photos with the kids. The main view on the basement dashboard runs an Immich-frame instance that surfaces a random assortment of family photos, and being able to rotate the home assistant display toward whoever is looking at it is a small but welcome touch. In hindsight I’d have bought a swivel for the kitchen too. Lesson learned.
The cable detail nobody mentions: The stand choice mattered less to me than the cable. I specifically went looking for a right-angle USB charging cable with a slim ribbon profile. It sits flat against the stand and is nearly invisible once routed. It sounds minor until you’ve fought with a chunky cable sticking out at an awkward angle for months.
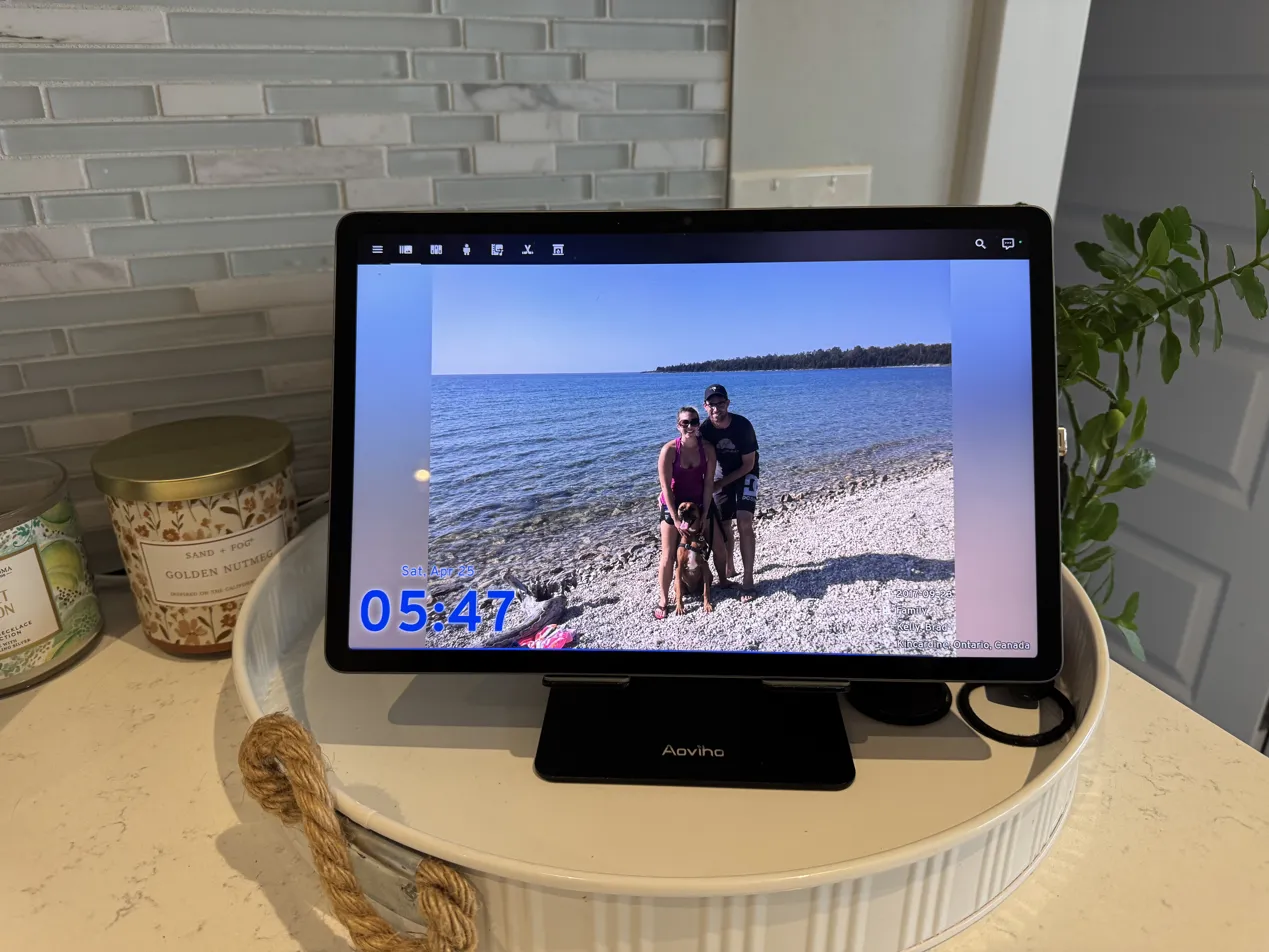
My home assistant display showing media controls and the low profile usb cable for charging.
The Software Foundation: HA Companion App in Kiosk Mode
The Home Assistant companion app has a built-in kiosk mode. When it’s active, pressing the Android home button returns directly to Home Assistant instead of the system launcher. The tablet becomes a dedicated home assistant display, not a general-purpose Android device.
My default view on the kitchen dashboard loads automatically. There’s no lock screen to tap through, no launcher to dismiss. It’s always on and always showing the right thing.
Both tablets currently run this setup, though I plan to switch both to Fully Kiosk Browser when I have the time. My basement tablet is further along in that transition. Fully Kiosk exposes charging state and screen control directly to Home Assistant, which means I can automate turning the screen off at night based on mmWave presence detection or the main floor UniFi camera, rather than relying on Android’s auto-lock. It also has its own native app launcher, so I can configure the tablet to show a curated app selection when it’s unplugged, and return to the Home Assistant dashboard automatically when it’s plugged in at home. When we travel, the tablets lose HA access entirely since my dashboards use local-only accounts. Fully Kiosk handles that transition cleanly.
The Dashboard: Six Views, One Panel
The home assistant display runs a dedicated dashboard with six views. Each one earns its place.
View 1: Photos
The default view is a full-screen iframe loading an Immich-frame instance, which pulls a random assortment of family photos from my self-hosted Immich library and cycles through them. It’s what the tablet shows when nobody is actively using it.
Pressing the Android home button returns to this view from anywhere else in the dashboard. In practice that makes the tablet behave like a photo frame when it’s not being used as a control panel. It’s a small detail, but it changes how the tablet feels in the kitchen. It is not a black screen waiting to be useful. It’s already doing something.
View 2: Home
This is the main control view. It combines everything the family needs at a glance into a single screen.
Across the top, a row of badges shows both our home and away presence states, outdoor temperature, feels-like temperature, pool temperature, and hot tub temperature. All of it is live and local.
Below that, the view is split into four sections. The weather forecast card shows a full six-day outlook with UV index as the secondary attribute. The lights and locks glance card covers the kitchen pots, island lights, counter lights, and great room lights, plus all exterior door locks. State colour makes it immediately obvious what’s on and what’s unlocked. One tap to toggle anything. The calendar shows a two-day view across all four family calendars: my work calendar, my personal calendar, the family calendar, and Kelly’s calendar. It’s the first thing either of us checks after coffee.
The fourth section is the G4 Doorbell camera feed, shown as a live picture-entity card. Notice in the screenshot below that the label reads “Front Door Package detected.” That’s a live state from the UniFi Protect binary sensor updating directly on the screen. The feed displays in greyscale by default and switches to full colour when a package is detected. This connects directly to the doorbell automations I’ve written about previously. The tablet becomes part of the notification loop, not just a passive display.
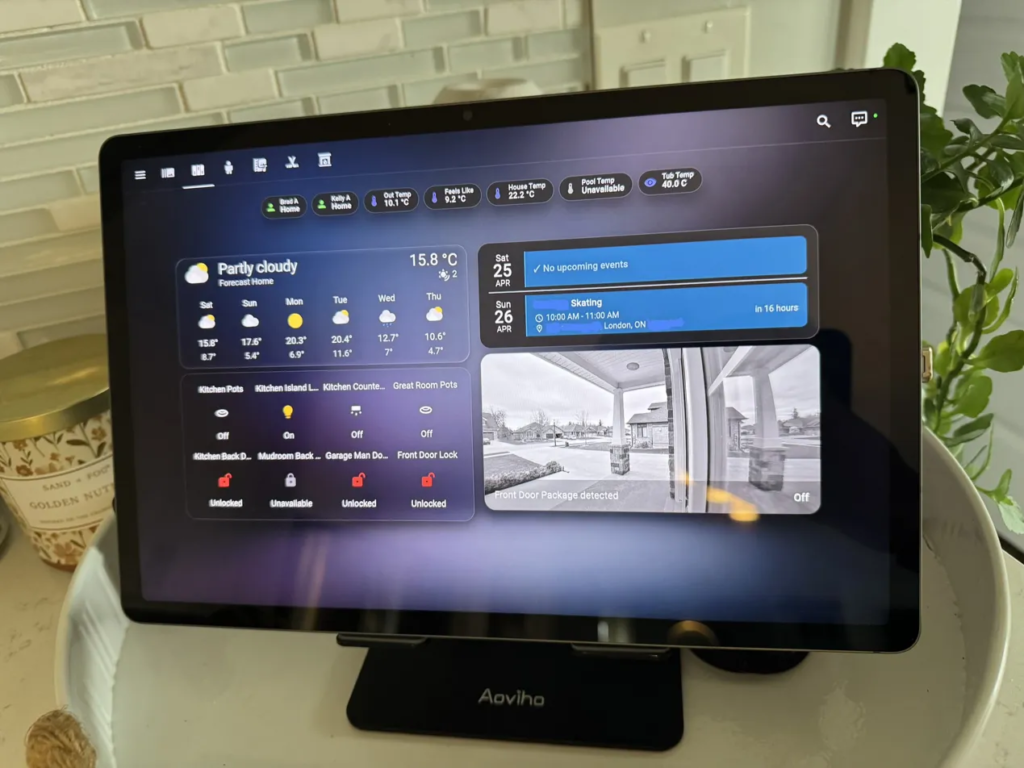
The Home view: presence badges across the top, weather, lights, locks, calendar, and a live front door camera feed showing an active package detection state and the low profile usb charger.
View 3: Kids Chores
This is the view I didn’t expect to matter as much as it does.
When the Lenovo display was still running, I kept seeing ads for Skylight, the dedicated family chore and calendar display. It looks polished. It markets well. However, it requires a subscription, it lives in the cloud, and it runs on its own dedicated hardware. The household IT department was not approving that. We needed our very own home assistant display.
So I went looking in HACS. I found Choremander first, then discovered TaskMate, a fork of Choremander that has grown well beyond its origins. I installed it and haven’t looked back.
This view is entirely TaskMate. Each child gets their own card showing only their chores, their coin balance, and their progress toward rewards. Chores appear based on time of day: morning tasks show in the morning, afternoon tasks in the afternoon, evening tasks in the evening. Miss the window, miss the coins. That time pressure is not accidental. It works.
When a chore gets checked off, confetti fires on screen. My kids love it. More importantly, they now ask to help with things they never showed any interest in before. TaskMate recently added a reward allocation feature that lets them direct their earned coins toward specific rewards, or save toward shared larger ones. You can see it in the screenshot below: the reward goal card in the centre showing progress toward 100 coins. That addition turned a chore tracker into something closer to a financial literacy lesson. A 7-year-old and a 5-year-old are now genuinely thinking about whether to spend their coins now or save for something bigger. That’s not a feature I expected from a home automation add-on.
Combined with the calendar already on the Home view, the kitchen tablet now covers everything Skylight does: chores, family schedule, and rewards. Plus everything Skylight never could. It’s what you’d get if a Google smart display and a Skylight merged, went fully local, and dropped the subscription.
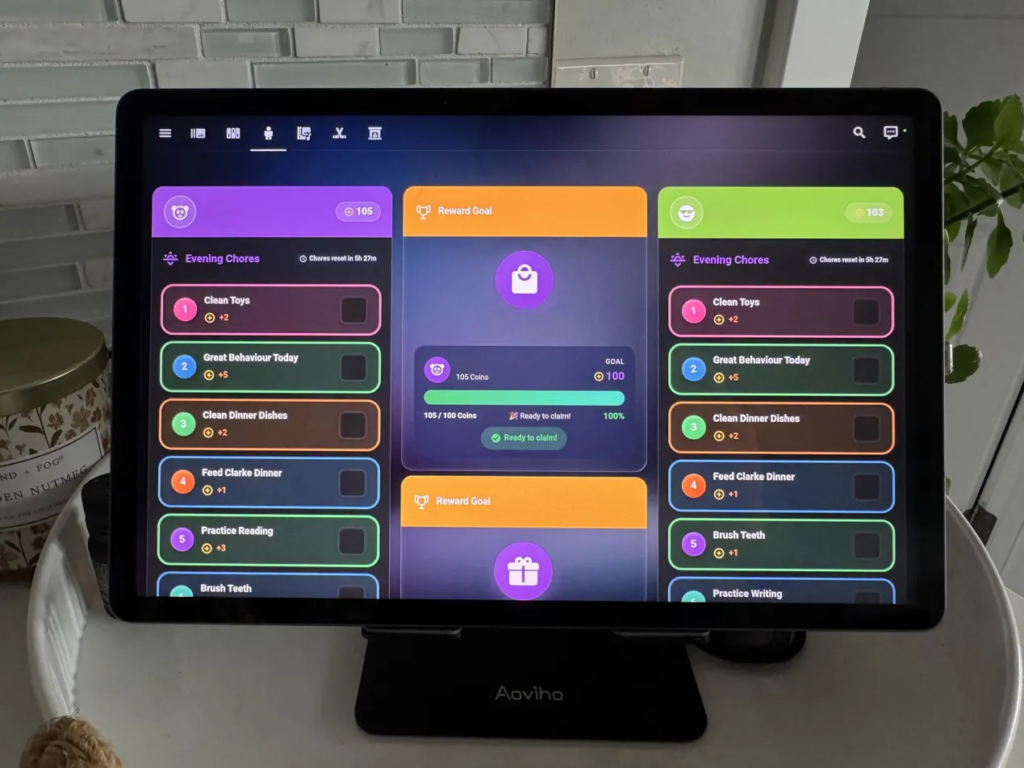
The Kids Chores view: each child has their own TaskMate card with time-based chores, coin values per task, and a shared reward goal tracker in the centre. The reward goal shown is ready to claim at 100 coins.
What’s Still Coming: Meal Planning with Mealie
The one area where Skylight still has a feature I haven’t fully replaced yet is meal planning. That’s changing.
I’m running Mealie in Docker, a self-hosted recipe and meal planning app that Kelly and I both have logins to. We’re currently working through adding our recipes and building out weekly meal plans. Once that’s settled, the plan is to surface today’s meal directly on the kitchen dashboard, most likely on the Home view or as an overlay on the Photos view. Everything about it will be local and owned, with no subscription, no third-party app deciding what format your grocery list is in.
I’ll write a full follow-up once it’s running smoothly and I’ve lived with the integration for a few weeks. I won’t document it until I can document it honestly.
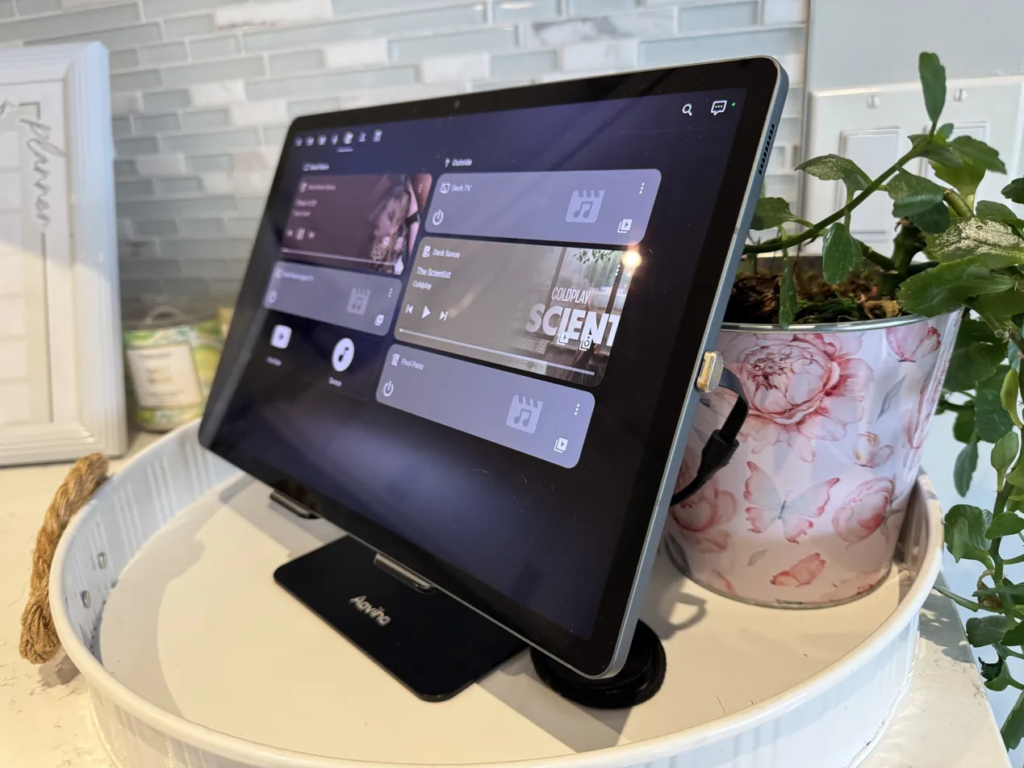
View 4: Media
The Media view covers everything audio and video in the main living areas. The great room Apple TV, the great room Sonos, the Deck Sonos, and the Pool Patio speakers all have controls here. One tap to play, pause, or adjust volume without reaching for a phone or opening a separate app.
This view also serves as the app launcher for the kids. A Button Card configured with the YouTube app’s URI lets them jump directly into YouTube on the tablet. There’s also a shortcut to the Sonos app itself for when we need it. Getting those URI shortcuts working takes a bit of digging since not every Android app exposes a clean deep link, but Button Card handles it well once you have the right string.
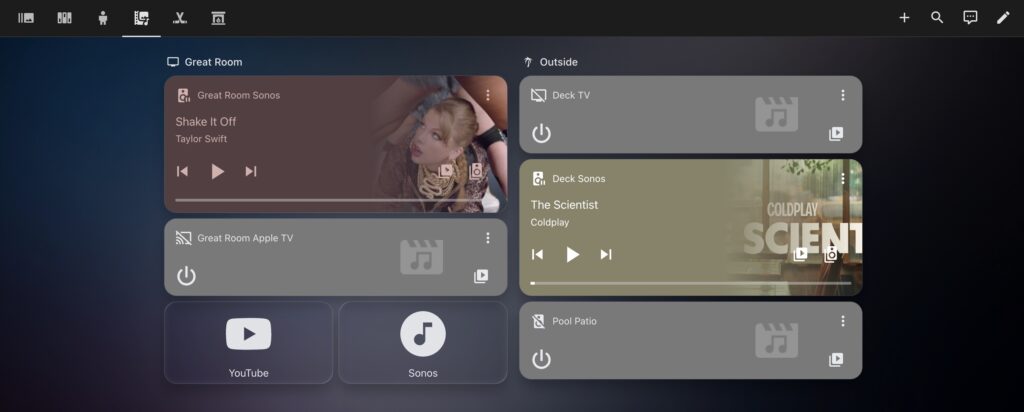
The Media view: Apple TV, great room Sonos, Deck Sonos, and Pool Patio speaker controls, plus app shortcuts for YouTube and Sonos. Coldplay on the deck at the time of this shot.
View 5: Sports
The Sports view is built around the Team Tracker integration, showing scores and upcoming games for the Leafs and the Blue Jays. The background is a photo of our family at a local hockey game, with frosted glass theme cards layered on top. It’s a simple view, but it’s one of the most-glanced-at screens in the house on game days.
View 6: HVAC
The final view covers climate control. The Nest Thermostat modes and temperature controls are here, along with the Dyson Heat and Cool fan in the basement. It’s a straightforward view, but having it one tap away from the kitchen means nobody needs to hunt for the thermostat or pull out a phone to adjust the Dyson.
Local Voice Control: Replacing Google Assistant Properly
This was the part that required the most work, and also the part I’m most pleased with.
The Lenovo display ran Google Assistant. Replacing it meant replacing voice entirely, not just the hardware. I’m running a fully local voice stack: Piper TTS for speech output, Wyoming Protocol for the pipeline, and Home Assistant Voice PE satellites for the microphones. The kitchen tablet uses a Voice Satellite Card (HACS, v6.12.0) to connect the local pipeline to the screen, so voice interactions show up as a visual response on the tablet at the same time they play through the speaker.
The Wake Word Problem
Getting voice to work reliably was the hardest part of the whole setup. The first thing I tried was “Alexa” as the wake word. I even trained both my voice and Kelly’s. The result was constant false positives, with the assistant triggering on random conversation, the TV, background noise. Kelly’s patience with it evaporated quickly, and that was a hard spouse approval rating problem to recover from.
After testing a lot of options, I found that wake word length matters more than I expected. Short wake words, one or two syllables, trigger far more false positives than longer, more phonetically distinct ones. The sweet spot is a wake word that’s unique enough to not appear in normal conversation and long enough to require a deliberate utterance.
I settled on “Hey Cortana” using a custom wake word model from the TaterTotterson microWakeWords repository. It runs through openWakeWord in the HA voice pipeline. False positives dropped to near zero. It sounds strange at first (yes, that Cortana), but after a week it’s just the word you say to the kitchen. It works.
The CPU Problem
Once wake word detection was reliable, I hit a TTS quality issue. Response latency was noticeable and voice quality was inconsistent. The culprit was resource constraints on my Home Assistant VM in Proxmox. Piper TTS requires real CPU headroom, especially under concurrent load.
The fix was straightforward given the Proxmox foundation: I bumped the HA VM to 8 cores and 16 GB of RAM. Latency dropped immediately and TTS quality became consistent. If you’re running HA on shared hardware and notice voice processing lag, look at your VM allocation before troubleshooting the pipeline itself.
One more detail worth sharing: Piper offers a lot of voice options and the quality varies significantly between them. After testing several, Kelly and I both landed on libritts (High) as the best sounding option. It’s worth spending 10 minutes comparing voices before committing to one — the difference between the low and high quality variants alone is noticeable.
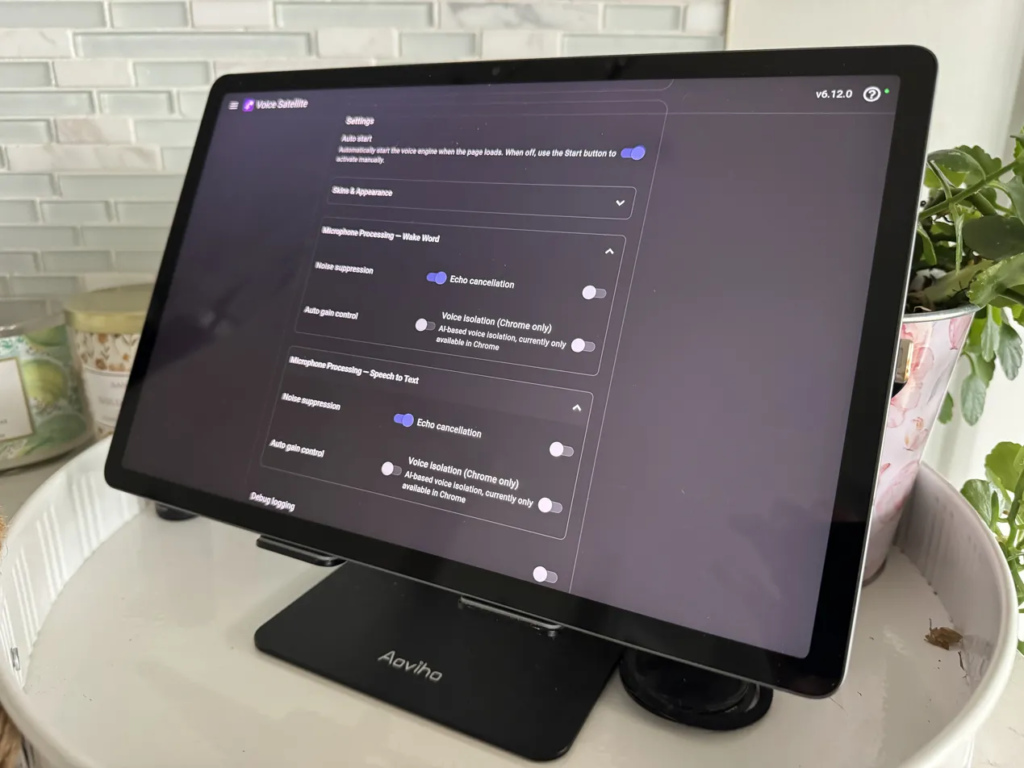
The Voice Satellite card settings panel, v6.12.0, showing the microphone processing configuration for both wake word detection and speech to text. Echo cancellation is enabled; voice isolation requires Chrome and is currently off.
What the Lenovo Display Could Never Do
When the Lenovo display was running, it handled the basics: weather, timers, Google Assistant for light commands. However, there was a hard ceiling on what it could do because everything had to go through Google.
My UniFi cameras had no path to the screen. When the G4 Doorbell rings, the Lenovo couldn’t show me who was there. It couldn’t surface my Home Assistant automations. It had no awareness of package detection, no integration with locks or presence, and absolutely no chore tracking.
Today, when someone rings the doorbell, the kitchen tablet responds as part of the automation: a TTS announcement fires, and the front door camera feed is right there on the default view. When a package is detected, the LED rings on my Voice Assist PE and Satellite1 speakers change colour and the tablet announces it. If the kids check off a chore, confetti. When a Leafs game is on, I know from across the kitchen.
Furthermore, voice control works even when the internet is down. The assistant pipeline is local. Controlling lights, checking locks, asking about the weather. All of it runs on hardware in my house. I do use Claude as the conversation agent for more complex queries, so that piece isn’t fully offline, but issuing device controls without an internet connection works exactly as expected. That’s something no smart display with a cloud dependency could ever offer.
What’s Coming Next
Two things are on the roadmap for this setup.
Mealie meal planning: once the recipe library is built out and the integration is stable, I’ll write a dedicated post covering how to surface meal plans on the kitchen dashboard. The goal is to have today’s dinner visible at a glance on the same screen the family already looks at a dozen times a day.
Fully Kiosk Browser: when I make the switch on the kitchen tablet, I’ll cover the automation side of screen management: turning the display off when nobody’s detected on the main floor, switching to a curated app launcher when the tablet leaves home, and exposing charging state to Home Assistant for battery health automations. The basement tablet is already running this setup and it’s working well.
The Setup at a Glance
If you want to replicate this:
- Kitchen tablet: Samsung Galaxy Tab S9 FE+: larger, brighter, quality microphones for Voice Satellite
- Kitchen stand: Aoviho height and angle adjustable stand: prioritize a right-angle, low-profile USB cable over the stand itself
- Basement tablet: Samsung Galaxy Tab A9: solid dashboard display; mic quality limits voice pickup compared to the S9 FE+
- Basement stand: Lumicall swivel stand: worth buying swivel from the start; the kitchen stand is next in line for an upgrade
- Kiosk: Home Assistant companion app in kiosk mode (moving to Fully Kiosk Browser for more control)
- Voice: openWakeWord + Piper TTS + Wyoming Protocol + Voice Satellite Card (HACS)
- Wake word: “Hey Cortana” via TaterTotterson microWakeWords
- Chores: TaskMate (HACS)
- Meal planning: Mealie (Docker, integration in progress)
- VM resources if on Proxmox: at minimum 8 cores and 16 GB RAM if running voice locally
Smart Home Secrets is reader-supported. We may earn a commission if you buy through our links.