Turn a Raspberry Pi and Stream Deck Into a Physical Home Assistant Launchpad
📅 Published: May 2026 | ✍️ By Brad Andrews | ⏱️ 14 min read
I need to share with you the magic behind what made this project work. I have an IT background and could have built this myself, but I didn’t. I have had a Stream Deck for years, hardly if ever used really, and a Pi5 more recently waiting for the chance to step up to the plate. I am a baseball fan for the record. The magic is Claude and using AI, because without that I would not have had the motivation to try and tackle this, especially on the day I did with my son home from school sick. On my own I would have got there, maybe in several hours, maybe putting it down and coming back and taking days. Thanks to Claude I had it done with tweaks and tested in a couple of hours and the ideas just flowed naturally into how I wanted it to work.
I think it is important in this day and age to know when and why AI was used, but also when you should use it to help yourself improve or make tasks easier to manage. You can accomplish what I did using the free tier, although I do have Pro, and link this article as a foundation, almost a pre-prompt if you will, to get started if needed. Claude handled the code while I handled the idea, the design, and the flow of how I wanted, if not expected, it to work. It was like having a co-worker right there the whole time that just gets it done.
So in short, here is how I set up my Stream Deck using Claude, from “wouldn’t it be cool if” to a complete working control panel of real buttons.
Two Pieces of Hardware, One Year of Procrastination
The Stream Deck on my desk had been sitting there doing video editing shortcuts for a while and then just kind of stopped doing anything at all, honestly it became part of the furniture more than a tool. The Pi5 on my shelf was a more recent addition, I had plans to turn it into a Bluetooth presence sensor but kept looking at it thinking yeah that’s a project for another day, and another day kept coming and going. A few months back I stumbled on a thread in r/homeassistant about people using a Stream Deck to control Home Assistant and I thought well I’ve got both of those things, I’ve got no good reason not to try this.
Still sat on it a bit longer though, I won’t pretend otherwise.
What actually got me moving was my son being home sick on a Monday. He’d had a rough weekend and needed a day to recover, and by mid-day he was restless and so was I, so I pulled up the laptop and said let’s do this. He dragged his chair right over next to mine and started asking questions. I answered as best as a dad can when a young kid wants to know what Python is. When the buttons lit up the first time he said “Dad, I am learning” and I thought yeah, me too kid.
By the time we wrapped up I showed him the button with his initial on it and he knew right away what it would do because he and his sister already ask the voice assistant in the upstairs playroom for AI generated stories at bedtime. Press it, wait about ten seconds for Claude to write something fresh, and Piper reads him his own personalised adventure through the Sonos. He listened to three stories that afternoon giggling through every one and has asked for more every day since. Not a bad first day for a project that sat on a shelf for a year.
What This Actually Is
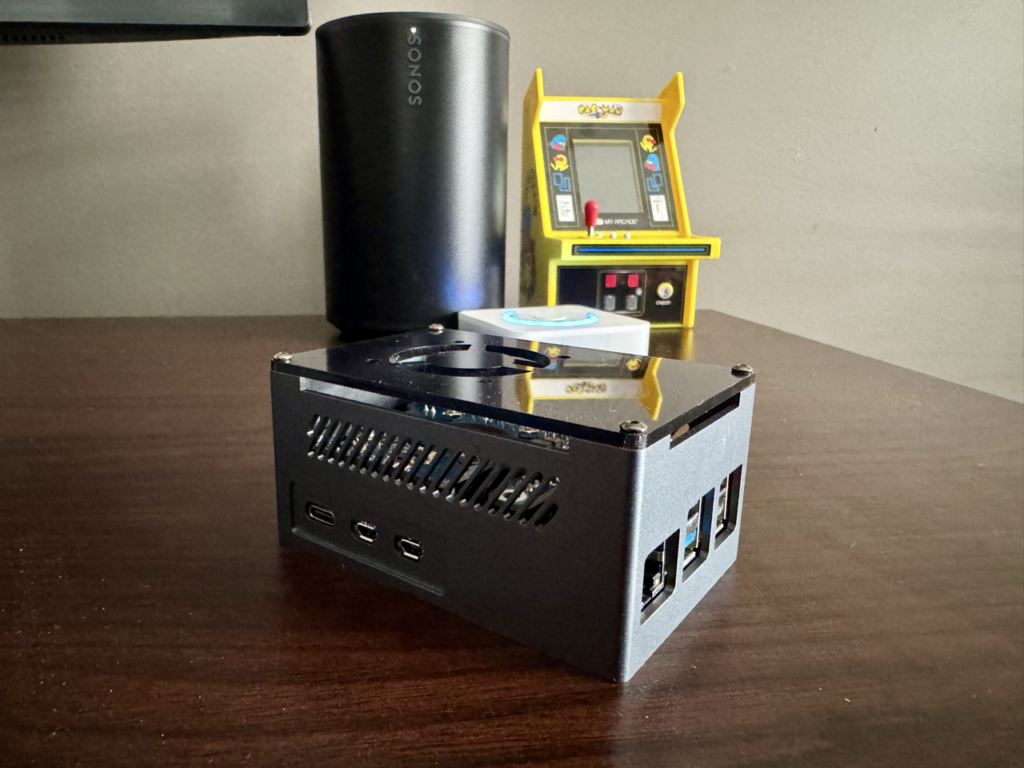
A headless Pi 5 running a Python daemon. It connects a Stream Deck MK2 to Home Assistant over the local network via the REST API. No cloud, no Node-RED, nothing in between. The python-elgato-streamdeck library handles the hardware, Pillow draws the buttons, requests makes the HA calls.
22 controls across two pages on 15 physical buttons.
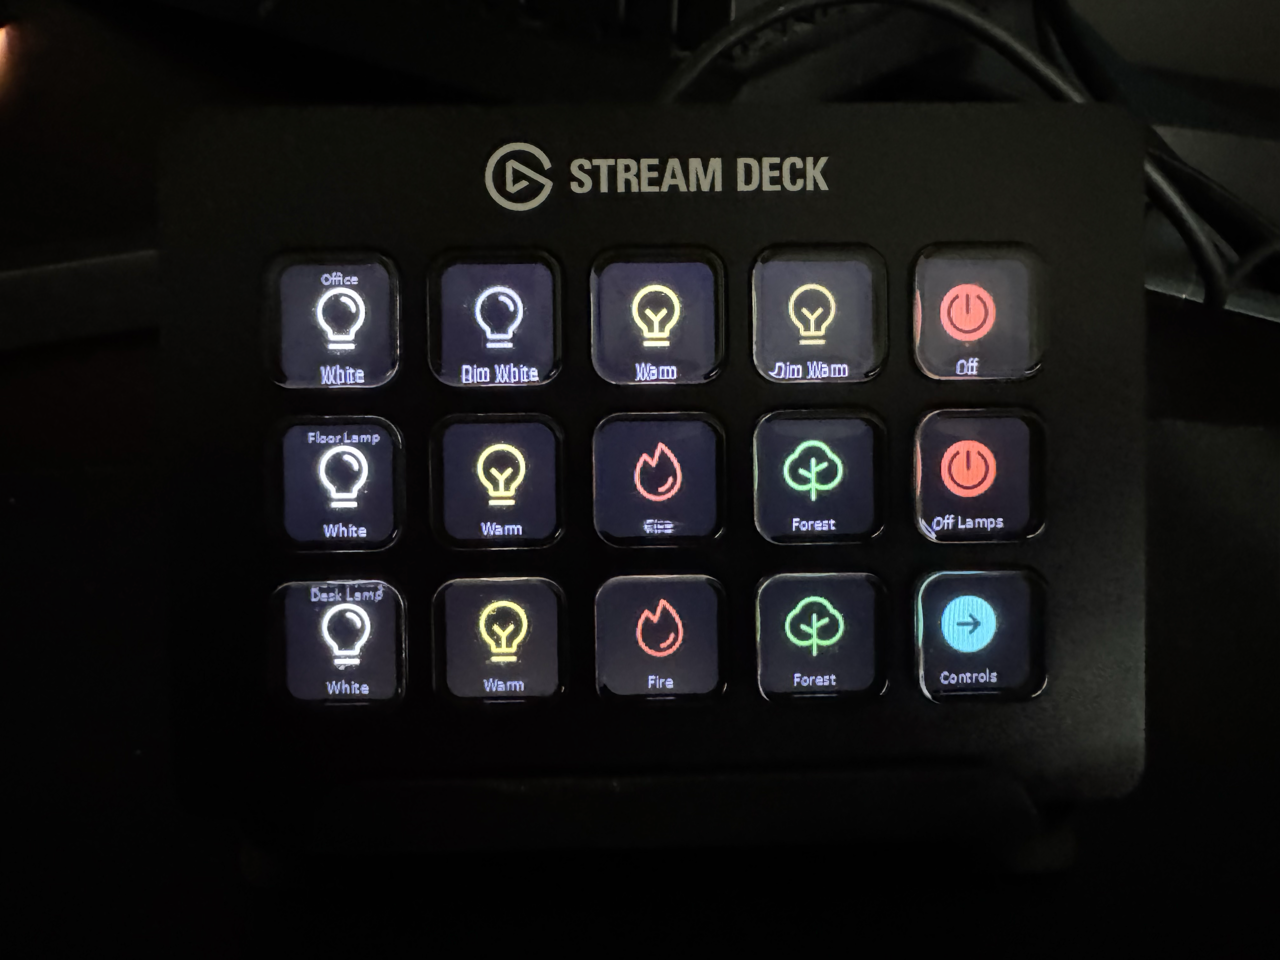
Page 1 is all lighting. Three rows: office ceiling light, floor lamp, desk lamp. The ceiling gets four scenes: full white, dim white, warm, dim warm. The lamps add Govee fire and forest scenes on top. Buttons use Phosphor icon PNGs, outlined when off, filled in scene colour when active. Press the active scene to turn it off. Startup reads live HA state so the display is always accurate.
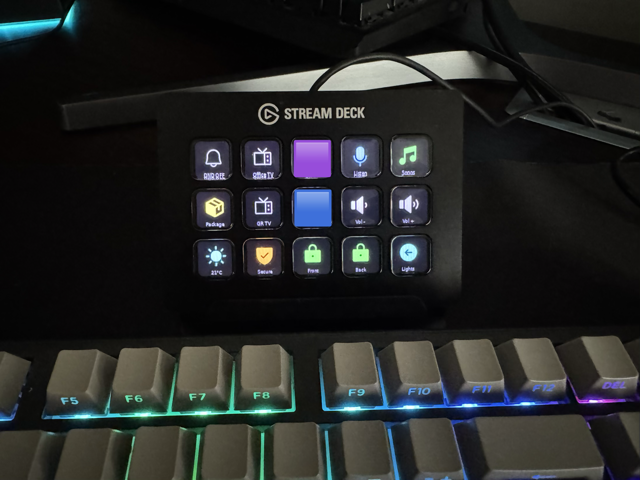
Page 2 is everything else. I thought I was building five or six buttons. Once I mapped out what I actually reach for my phone to do while sitting at my desk it became 22 fast. The interesting ones are worth a few extra words.
The Buttons Worth the Extra Words
DND Toggle
One button and the two Z-Wave switch LEDs outside my office doors go red. Doors closed, red LEDs showing, family knows to come back later. It is a small corner indicator on each switch, nothing dramatic, but it works and the family respects it.
Worth a quick note on the wiring because it is a bit odd. My office uses 3-way switch setups with a main smart switch and an auxiliary switch on each circuit. The way my electrician wired the house during the build, one circuit has its main smart switch on the second floor even though the light itself is on the first floor, and the other is the opposite. I am not going to rewire it, it works fine, but it does mean only the main smart switches have the LED indicator I can control. The auxiliary switches on each circuit have no LED so they do not factor in here.
The Z-Wave parameter you need is called LedColorSet_switch. HA creates a number entity for it but disables it by default, so a standard service call won’t get you there. Use zwave_js.set_value with command class 112, property 14, value 1 for red and value 0 for white. I had wanted to do this for probably a year and just never sat down to do it. Now it’s a button.
One thing to create in HA before the script will work: an input_boolean helper called input_boolean.stream_deck_dnd_active. Go to Settings, Helpers, Add Helper, Toggle, and name it Stream Deck DND Active. The script uses this to track current DND state so the button icon always reflects reality on startup.
The Story Buttons
My kids use the voice assistant in the upstairs playroom for AI-generated bedtime stories already. Claude writes one fresh, Piper reads it back. They love it. A physical button version for my office was an obvious add once the Stream Deck was in play.
One button per child, each with their initial. Press it and that child becomes the main character of a completely random adventure. Their sibling and Clarke the dog always come along and everyone makes it home safe at the end. Claude generates something new every single press: space exploration, underwater kingdoms, enchanted castles, dinosaurs, whatever it lands on. The story title announces first, then the full story plays through the office Sonos via Piper using the LibriTTS high voice. Eight to ten seconds from button press to first word.
When my kids wander into the office while I am working, I start a story and they sit and listen. They get dad time. I keep working. Nobody loses.
Weather Report
Button face shows current outside temperature, refreshes every 30 seconds. Press it and the office Sonos reads a full forecast: conditions, wind speed, pool water temp, hot tub water temp from actual sensors, then two separate recommendations.
Swimming: air above 24 degrees, wind under 19 km/h, sunny or partly cloudy.
Hot tub: good whenever wind is 19 km/h or under. Under 5 degrees outside it suggests a toque. Snowing and it warns you might want to shovel a path first.
Sounds like an odd button for a home office. Finishing a work-from-home day in Canada and knowing in one press whether the evening is a swim or a hot tub is useful about four months of the year.
Secure Check
Press it and the office Sonos reads me the full house. Every lock, both garage doors, lights on per floor, who is home, and whether anyone or Clarke is in the backyard.
It only names locks that are a problem, so anything unlocked, unavailable, or unknown gets called out by name and everything else is covered with “all other locks are secured.” Garage doors come out as one sentence, either both closed or which one isn’t. Floors with no lights skip entirely, and if the whole house is dark it just says all lights are off. At the same time a full list of every light that is actually on shows up on my iPhone as a notification.
Is this something I absolutely need? No. Do I think I will use it most nights before heading upstairs eventually? Probably yes.
What You Need
Hardware
- Elgato Stream Deck MK2: 15 buttons, 3×5
- Raspberry Pi 5: 2GB or 4GB is enough for this workload
- PoE+ HAT if you want clean power over ethernet. The Pi 4 PoE HAT does not work on the Pi 5, you need the Pi 5 version specifically.
- Standard USB-C adapter if PoE is not available
If you ran Cat6 when you built or renovated, PoE is the cleanest option. Single cable for power and network. No Cat6 nearby is fine too. The Pi connects over Wi-Fi without issues and this workload is light, just occasional REST calls.
Software
Everything is free and open source. The only account you need is a Home Assistant long-lived access token from your own instance. All scripts are available on GitHub, link at the end of the article.
The Build
Step 1: Flash the OS
Raspberry Pi Imager, Raspberry Pi OS Lite 64-bit. Before writing the image, configure your hostname, enable SSH, and set your username and password in the Imager settings. Boot the Pi, find its IP on your network, SSH in.
Step 2: Update and Install Dependencies
bash
sudo apt update && sudo apt upgrade -y
sudo apt install -y python3-full python3-venv libudev-dev libusb-1.0-0-dev \
  libhidapi-libusb0 libffi-dev libjpeg-dev zlib1g-dev
Step 3: Python Virtual Environment
bash
python3 -m venv /home/YOUR_USERNAME/streamdeck-env
source /home/YOUR_USERNAME/streamdeck-env/bin/activate
pip install streamdeck pillow requests cairosvg
Replace YOUR_USERNAME with the username you set during the OS flash. Every path in this guide uses that same placeholder.
Step 4: udev Rule
Without this the daemon needs root to access the Stream Deck USB device. One file fixes it.
bash
sudo nano /etc/udev/rules.d/99-streamdeck.rulesPaste this single line:
SUBSYSTEM=="usb", ATTRS{idVendor}=="0fd9", GROUP="plugdev", MODE="0660"Then add your user and reload:
bash
sudo usermod -aG plugdev YOUR_USERNAME
sudo udevadm control --reload-rules
sudo udevadm trigger
Plug in the Stream Deck and confirm the Pi sees it:
bash
lsusb | grep -i elgatoYou should see Elgato Systems GmbH Stream Deck original V2 or similar depending on your model.
Step 5: Phosphor Icons
The buttons use Phosphor Icons, 1,248 icons across 6 weights, all free and MIT licensed. Download download_icons.py from the GitHub repo and place it at /home/YOUR_USERNAME/streamdeck/download_icons.py. Then run it directly on the Pi since it has unrestricted internet access. It pulls the full set as SVGs from jsDelivr CDN and converts each one to a 72×72 PNG using cairosvg. Takes 10-15 minutes. The result is around 7,500 PNGs organised by weight under /home/YOUR_USERNAME/streamdeck/icons/png/.
The daemon uses the light weight for inactive button states and fill for active states. A Pillow tinting function applies colour to each icon through the alpha channel so no separate coloured icon files are needed.
Step 6: HA Long-Lived Access Token
In Home Assistant go to your profile, scroll to Long-Lived Access Tokens, and create one. Name it whatever makes sense to you. Copy it the moment it appears since HA will not show it again.
bash
mkdir -p /home/YOUR_USERNAME/streamdeck
nano /home/YOUR_USERNAME/streamdeck/config.py
python
HA_URL = "http://YOUR_HA_IP:8123"
HA_TOKEN = "YOUR_TOKEN_HERE"
Step 7: HA Scripts
The complex buttons run HA scripts rather than direct service calls from the Pi. This keeps the Python clean and lets you test and adjust script logic entirely within HA without touching the Pi.
Before creating any script files, check how your configuration.yaml loads them:
bash
grep -i "script" /config/configuration.yamlIf you see script: !include_dir_merge_named scripts, your scripts need to go into /config/scripts/ as YAML files. If you put them in scripts.yaml instead, HA silently ignores the file and nothing breaks. It just does not work. Worth knowing before you spend time chasing a ghost.
All 13 scripts are on the GitHub repo with every entity ID replaced by an ALL_CAPS placeholder. Download the YAML files, open them in any text editor, use Find and Replace to swap each placeholder for your own entity IDs, then drop them into your scripts directory. Each script has a comment above every placeholder explaining what it expects.
After adding the files, reload scripts from Developer Tools in HA. No full restart needed.
Step 8: The Python Daemon
The daemon is a single Python file. On startup it opens the Stream Deck, reads current HA state, and renders the display based on what is actually on. A key callback handles button presses. A background thread refreshes the display every 30 seconds to keep lock states, DND, and the weather temperature current without a button press being required.
Button images are built by loading a Phosphor PNG, tinting it with Pillow using the alpha channel as a mask, and centring it on a 72×72 black canvas with a small text label at the bottom. The story buttons use large rendered text characters instead of PNG icons so each child’s initial reads clearly at button size.
The full daemon is on the GitHub repo alongside the scripts. Download streamdeck_daemon.py and place it at /home/YOUR_USERNAME/streamdeck/streamdeck_daemon.py.
Step 9: systemd Service
bash
sudo nano /etc/systemd/system/streamdeck.serviceini
[Unit]
Description=Stream Deck Daemon
After=network.target
StartLimitIntervalSec=0

[Service]
Type=simple
User=YOUR_USERNAME
WorkingDirectory=/home/YOUR_USERNAME/streamdeck
ExecStart=/home/YOUR_USERNAME/streamdeck-env/bin/python3 /home/YOUR_USERNAME/streamdeck/streamdeck_daemon.py
Restart=always
RestartSec=5
StandardOutput=journal
StandardError=journal

[Install]
WantedBy=multi-user.target
bash
sudo systemctl daemon-reload
sudo systemctl enable streamdeck
sudo systemctl start streamdeck
sudo systemctl status streamdeck
Auto-starts on every boot. Recovers from any crash within 5 seconds. Check the logs anytime with sudo journalctl -u streamdeck -f.
Map Your Buttons Before You Build
The real part that made this easier was thinking about my actual day sitting at my desk and what I would and would not use. I never used to be much of a lamp guy, until adding a Govee desk lamp and an uplighter lamp to my office. Now I use lamps late at night or when writing vs the overhead and it is truly great. So lighting control, absolutely need that on my Stream Deck, but closing my garage door, probably not that useful from my desk much. Before I realized it, lighting filled up one page and I hadn’t even built anything yet. DND makes sense, I need the kids or my wife to know if the doors are closed whether they can or cannot come in. I use that the most probably, even if my youngest doesn’t use it or care about it at all. So thinking about the interruptions when I am trying to focus, why not add an AI generated story button so at least they get a story read to them about them as the main character and I can stay focused. Audio control naturally came after that. Anyway, you get it, there is a flow and a reason behind every button that just makes sense.
So map it out. Think about what you want to do where you put the Stream Deck, or any dashboard or control input for that matter. Then just go ahead and do it. You can always change or swap things later if you need different buttons or more.
My Honest Take
Now that the dust has settled and this really has become something I use every day, and even the kids from time to time, it was totally worth it. I should have done this way sooner because it really is a nice little way to take quick action. In my mind this was complex, hard to do, going to take ages to get it right and figure it all out. Claude took the architecting and code out of my hands, and I don’t mean this to be some Claude success story, but it kind of is. The only thing Claude cannot do though is know what you want or how you will use it without providing that clear context.
The desk is still a little messy, but now it is a little bit smarter and more user friendly. I get to leave my phone charging and at the same time keep the distraction of that phone at bay a little bit more. These are all things I wanted to do for a while and even had the hardware for. Claude more or less removed that mental block and really helped me get over my own doubt to get started and most importantly done.
I am constantly still tweaking and dialling things in, if not adding new and sometimes necessary, sometimes not, things to Home Assistant. Now if the button would just turn up the sun too, so I can hear more great days for swimming in the weather briefing, my daughter would love that. She would jump in that pool if it was -10, so here is hoping the weather report button convinces her correctly when it is not a good day to swim.
So am I glad I finally built this and would I do it again knowing what I know now? Absolutely, and if you have a Stream Deck at home too, lets get building.
GitHub
All 13 scripts and the full Python daemon are at the link below. Each script is its own file with placeholder comments. The README explains what each one does, which entities you need to swap, and how to test before connecting to the Pi.
github.com/smarthomesecrets/Home-Assistant-PiDeck
Just getting started with Home Assistant? The full setup guide is here.
Building your own local voice assistant? Blueprint #7 covers the full Piper and Wyoming setup.
Share your build with #SmartHomeSecrets and #Declassified
Smart Home Secrets is reader-supported. We may earn a commission if you buy through our links.