
📅 Published: May 2026 | ✍️ By Brad Andrews | ⏱️ 9 min read
My HA setup runs over 200 different automations already and I pulled from what has recently run lately to make this list. You probably have your own really cool ideas similar or even better that these, I want to hear them too, so be sure to share via our Facebook page. This list of 10 I have tested, tweaked, lived with, loved, forgot about, and in the end I can say they are certified great, if that certification really means anything. Remember Smart Home Automations are all about making your life at home more comfortable and enjoyable. I always like to see those start their journey by planning out safety and security first, while figuring out what would make this moment easier or more fun second and automate based on lived experiences.
All of the automations listed here, I am sharing the Yaml for so you can copy them and fill in the placeholders too and build them or tweak them at home. I tried to focus this article on what you can easily build visually at the same time so that you don’t even have to wade through Yaml or any code at all.
Don’t worry though, here are my more complex favourites with yaml you can fill and chill all built with the same ideas. So Happy automating to you all and lets get started.
How to Use the YAML in This Article
Each automation below includes a YAML block. Here is the quickest way to use it:
- Go to Settings → Automations & Scenes → Create Automation
- Click the three-dot menu in the top right and select Edit in YAML
- Paste the YAML, then use Find and Replace to swap every
ALL_CAPSplaceholder for your real entity ID - Save and test
Your entity IDs live under Settings → Devices & Services or in Developer Tools → States. Search by device name to find them quickly.
Are you new to Home Assistant? You may want to check out the getting started guide here before diving in.
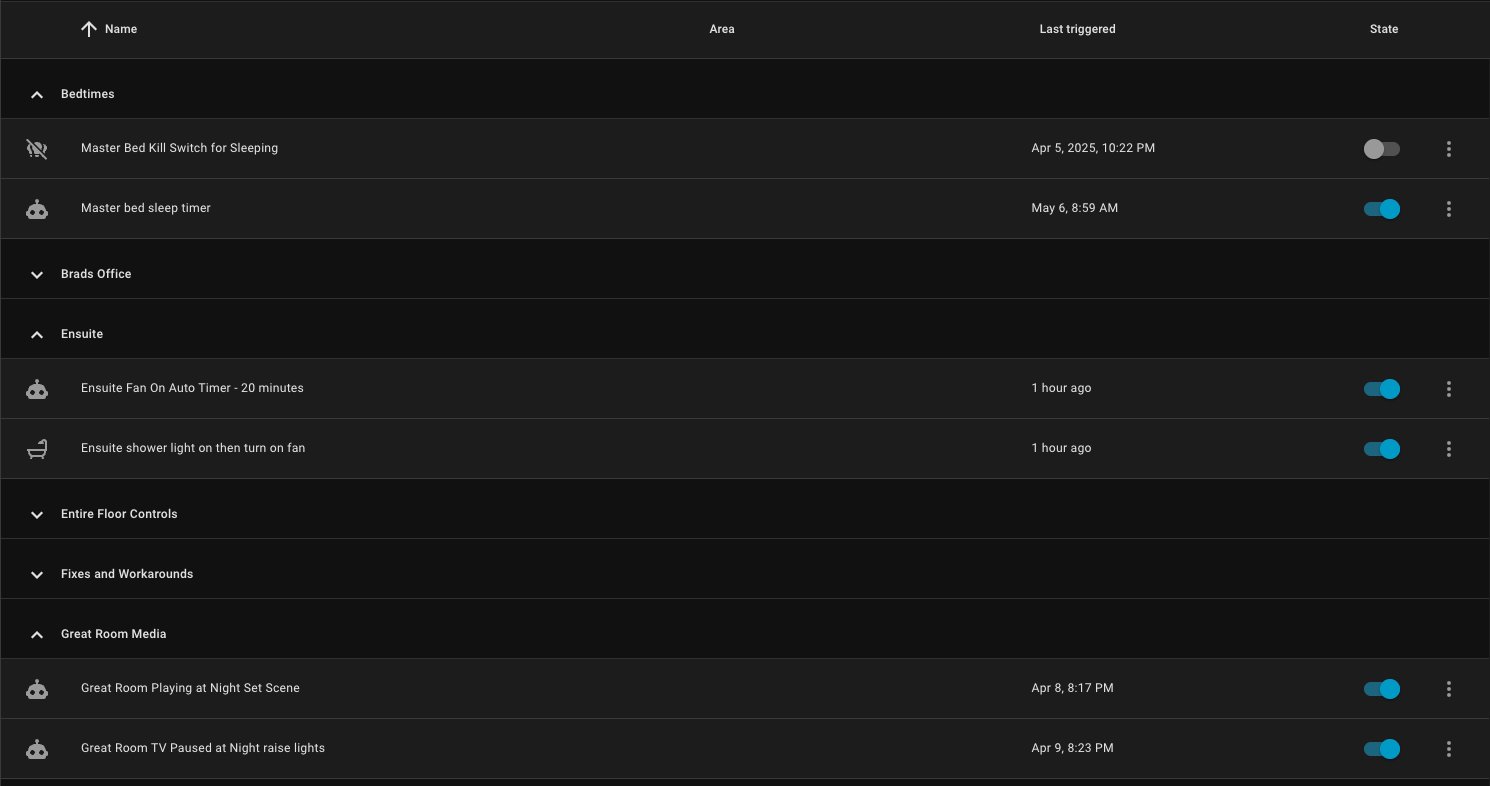
1. Ensuite Fan Auto-On and Auto-Off
What it does: When the shower light turns on, the exhaust fan turns on automatically. Twenty minutes later, the fan turns off on its own.
Why it matters: Humidity management without thinking about it. The fan runs long enough to clear the steam even after a quick shower, then shuts itself off. Two automations, one outcome.
What you need: A smart switch on the fan and a smart switch on the shower light.
Automation A : Fan On When Shower Light Turns On
yaml
alias: Ensuite Fan On When Shower Light Turns On
description: "Turn on the ensuite fan when the shower light turns on"
mode: single
trigger:
  - platform: state
    entity_id: switch.YOUR_SHOWER_LIGHT_SWITCH
    to: "on"
action:
  - type: turn_on
    domain: switch
    entity_id: switch.YOUR_ENSUITE_FAN_SWITCH
Automation B : Fan Auto-Off After 20 Minutes
yaml
alias: Ensuite Fan Auto Off After 20 Minutes
description: "Turn off the ensuite fan 20 minutes after it turns on"
mode: single
trigger:
  - platform: state
    entity_id: switch.YOUR_ENSUITE_FAN_SWITCH
    to: "on"
action:
  - delay:
      minutes: 20
  - type: turn_off
    domain: switch
    entity_id: switch.YOUR_ENSUITE_FAN_SWITCH
Replace: YOUR_SHOWER_LIGHT_SWITCH with your shower light entity ID. YOUR_ENSUITE_FAN_SWITCH with your fan switch entity ID.
Tip: The 20-minute delay in Automation B starts the moment the fan turns on, not when the shower ends. Adjust the delay to match how long your bathroom typically needs to clear.
2. Garage Door Auto-Close After 2 Hours
What it does: If a garage door has been open for two hours, it closes automatically.
Why it matters: This one has saved me more times than I can count. A door left open after unloading the car, or a door that didn’t fully close. This automation is a reliable safety net that runs silently in the background.
What you need: A smart garage door opener with a cover entity in Home Assistant.
yaml
alias: Garage Door Auto Close After 2 Hours
description: "Close the garage door if it has been open for 2 hours"
mode: single
trigger:
  - platform: device
    device_id: YOUR_GARAGE_DOOR_DEVICE_ID
    domain: cover
    entity_id: cover.YOUR_GARAGE_DOOR
    type: opened
    for:
      hours: 2
action:
  - type: close
    domain: cover
    device_id: YOUR_GARAGE_DOOR_DEVICE_ID
    entity_id: cover.YOUR_GARAGE_DOOR
Replace: YOUR_GARAGE_DOOR_DEVICE_ID with your garage door device ID. YOUR_GARAGE_DOOR with your cover entity ID. Both are found under Settings → Devices & Services.
Tip: If you have two garage doors, duplicate this automation and update the entity IDs for the second door. Takes 30 seconds.
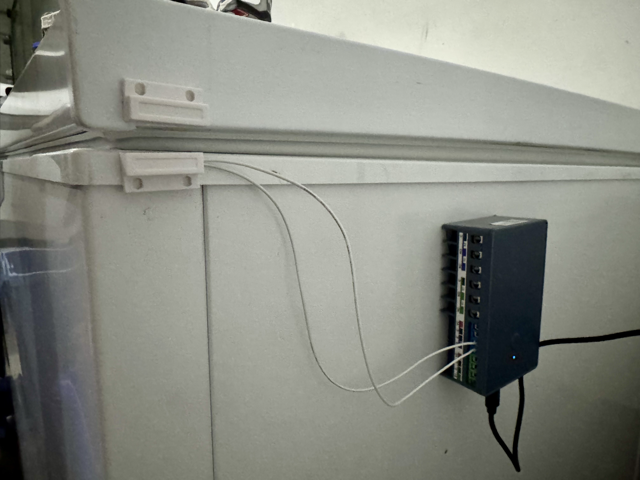
3. Freezer Left Open Alert
What it does: If the garage freezer contact sensor stays open for five minutes, both phones get a push notification.
Why it matters: A freezer left open overnight is an expensive problem. A five-dollar contact sensor and this automation make it impossible to miss.
What you need: A door or window contact sensor on the freezer lid.
yaml
alias: Freezer Left Open Alert
description: "Notify both phones if the freezer has been open for 5 minutes"
mode: single
trigger:
  - platform: device
    device_id: YOUR_FREEZER_SENSOR_DEVICE_ID
    domain: binary_sensor
    entity_id: binary_sensor.YOUR_FREEZER_CONTACT_SENSOR
    type: opened
    for:
      minutes: 5
action:
  - action: notify.mobile_app_YOUR_PHONE
    data:
      title: "Freezer Open for 5 Minutes"
      message: "Please close it!"
  - action: notify.mobile_app_SPOUSE_PHONE
    data:
      title: "Freezer Open for 5 Minutes"
      message: "Please close it!"
Replace: YOUR_FREEZER_SENSOR_DEVICE_ID and YOUR_FREEZER_CONTACT_SENSOR with your sensor’s device ID and entity ID. YOUR_PHONE and SPOUSE_PHONE with your mobile app notify targets, found under Settings → Devices & Services → Mobile App.
4. Porch Lights On and Off via Person Detection
What it does: When a person is detected on the porch camera at night, the porch pot lights turn on. Two minutes after the person is gone, the lights turn off.
Why it matters: Porch lights that only run when someone is actually there. No motion light cycling on and off for passing cars. Person detection is specific enough to matter.
What you need: A camera with person detection surfaced as a binary sensor in Home Assistant. UniFi Protect, Frigate, and several other integrations provide this.
Automation A : Porch Lights On
yaml
alias: Porch Person Detected at Night — Lights On
description: "Turn on porch lights when a person is detected at night"
mode: single
trigger:
  - platform: device
    device_id: YOUR_CAMERA_DEVICE_ID
    domain: binary_sensor
    entity_id: binary_sensor.YOUR_PORCH_PERSON_DETECTED
    type: turned_on
    for:
      seconds: 5
condition:
  - condition: sun
    after: sunset
    before: sunrise
action:
  - type: turn_on
    domain: switch
    device_id: YOUR_PORCH_LIGHT_DEVICE_ID
    entity_id: switch.YOUR_PORCH_LIGHT_SWITCH
Automation B : Porch Lights Off
yaml
alias: Porch Person No Longer Detected at Night — Lights Off
description: "Turn off porch lights 2 minutes after person detection clears at night"
mode: single
trigger:
  - platform: device
    device_id: YOUR_CAMERA_DEVICE_ID
    domain: binary_sensor
    entity_id: binary_sensor.YOUR_PORCH_PERSON_DETECTED
    type: turned_off
    for:
      minutes: 2
condition:
  - condition: sun
    after: sunset
    before: sunrise
action:
  - type: turn_off
    domain: switch
    device_id: YOUR_PORCH_LIGHT_DEVICE_ID
    entity_id: switch.YOUR_PORCH_LIGHT_SWITCH
Replace: YOUR_PORCH_PERSON_DETECTED with your camera’s person detection binary sensor. YOUR_PORCH_LIGHT_SWITCH with your porch light switch entity. The after: sunset / before: sunrise condition keeps the lights from cycling during daylight hours.
5. Nanoleaf 4D Follows the TV
What it does: When the TV turns on, the Nanoleaf 4D screen mirror effect activates. When the TV turns off, the Nanoleaf turns off too.
Why it matters: Bias lighting that just works. No app switching, no manual scene setting. The TV state drives everything.
What you need: A Nanoleaf 4D and a TV with a remote entity in Home Assistant. This works with Apple TV, Google TV, and most smart TV remotes via the HA remote domain.
Automation A : Nanoleaf On With TV
yaml
alias: TV On — Nanoleaf 4D Effect On
description: "Activate Nanoleaf 4D screen mirror effect when TV turns on"
mode: single
trigger:
  - platform: device
    device_id: YOUR_TV_REMOTE_DEVICE_ID
    domain: remote
    entity_id: remote.YOUR_TV_REMOTE
    type: turned_on
action:
  - action: light.turn_on
    data:
      effect: "4D"
    target:
      device_id: YOUR_NANOLEAF_DEVICE_ID
Automation B : Nanoleaf Off With TV
yaml
alias: TV Off — Nanoleaf 4D Off
description: "Turn off Nanoleaf when TV turns off"
mode: single
trigger:
  - platform: device
    device_id: YOUR_TV_REMOTE_DEVICE_ID
    domain: remote
    entity_id: remote.YOUR_TV_REMOTE
    type: turned_off
action:
  - action: light.turn_off
    data: {}
    target:
      device_id: YOUR_NANOLEAF_DEVICE_ID
Replace: YOUR_TV_REMOTE_DEVICE_ID and YOUR_TV_REMOTE with your TV’s remote device ID and entity. YOUR_NANOLEAF_DEVICE_ID with your Nanoleaf device ID. The effect name "4D" is case-sensitive. Check your available effects under Developer Tools → Services → light.turn_on.
6. Kids’ Lamp Auto-Off After No Motion
What it does: If no motion is detected in a room for five minutes and the lamp is on, the lamp turns off automatically.
Why it matters: Kids leave lights on. This automation fixes that without any reminders needed. The condition check (only turn off if the lamp is actually on) means it runs cleanly without unnecessary service calls.
What you need: A motion sensor and a smart lamp or smart switch in the room.
yaml
alias: Kids Room Lamp Auto Off After No Motion
description: "Turn off the lamp after 5 minutes of no motion, only if it is on"
mode: single
trigger:
  - platform: device
    device_id: YOUR_MOTION_SENSOR_DEVICE_ID
    domain: binary_sensor
    entity_id: binary_sensor.YOUR_MOTION_SENSOR
    type: no_motion
    for:
      minutes: 5
condition:
  - condition: device
    device_id: YOUR_LAMP_DEVICE_ID
    domain: light
    entity_id: light.YOUR_KIDS_LAMP
    type: is_on
action:
  - type: turn_off
    domain: light
    device_id: YOUR_LAMP_DEVICE_ID
    entity_id: light.YOUR_kids_LAMP
Replace: YOUR_MOTION_SENSOR_DEVICE_ID and YOUR_MOTION_SENSOR with your motion sensor’s device ID and entity. YOUR_LAMP_DEVICE_ID and YOUR_KIDS_LAMP with the lamp’s device ID and entity. Duplicate and update the entity IDs for each room you want to cover.
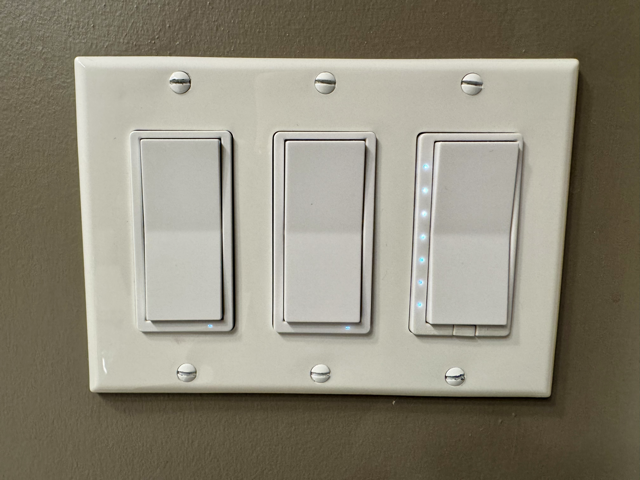
7. Kitchen Island Double-Tap Kills the Counter Light
What it does: A double-tap off on the kitchen island Z-Wave switch turns off the under-cabinet counter light at the same time.
Why it matters: Two lights, one gesture. The island and counter lights are always used together, so turning one off while forgetting the other stopped happening the moment this automation went in. This also demonstrates what Z-Wave multi-tap scenes can do, a feature most people leave unused.
What you need: A Z-Wave switch that supports Central Scene (most Inovelli, HomeSeer, and Zooz switches do). The scene events surface in Home Assistant via the Z-Wave JS integration.
yaml
alias: Island Light Double Tap Off — Counter Light Off
description: "Turn off the counter light when the island switch is double-tapped off"
mode: single
trigger:
  - platform: device
    device_id: YOUR_ZWAVE_SWITCH_DEVICE_ID
    domain: zwave_js
    type: event.value_notification.central_scene
    property: "scene"
    property_key: "002"
    endpoint: 0
    command_class: 91
    subtype: "Endpoint 0 Scene 002"
    value: 3
action:
  - type: turn_off
    domain: light
    device_id: YOUR_COUNTER_LIGHT_DEVICE_ID
    entity_id: light.YOUR_COUNTER_LIGHT
Replace: YOUR_ZWAVE_SWITCH_DEVICE_ID with your Z-Wave switch device ID. YOUR_COUNTER_LIGHT_DEVICE_ID and YOUR_COUNTER_LIGHT with your counter light’s device ID and entity.
Note on the trigger values: property_key: "002" is the off paddle, and value: 3 is the double-tap action. These values are standard for Z-Wave Central Scene but confirm yours by going to Developer Tools → Events, listening for zwave_js_value_notification, and physically double-tapping your switch to capture the exact values.
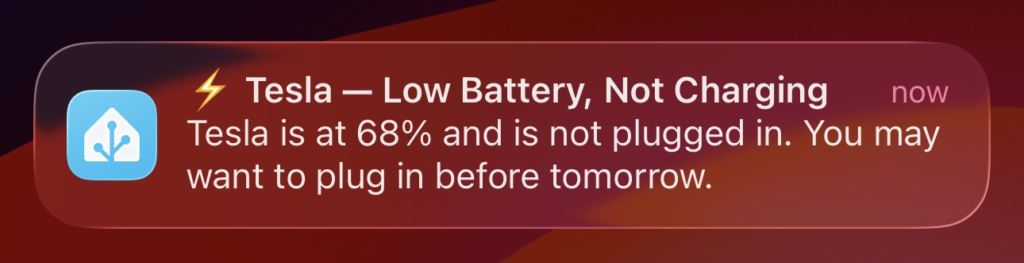
8. Tesla Low Battery Reminder at 9:45pm
What it does: Every night at 9:45pm, Home Assistant checks whether the Tesla battery is below 50% and the car is not connected to the Wall Connector. If both are true, a push notification goes to your phone.
Why it matters: One notification at a convenient time is easier than checking the Tesla app every night. This automation runs silently until it actually needs your attention.
What you need: The Tesla integration connected in Home Assistant. The battery level and Wall Connector sensors are included automatically once the integration is set up.
yaml
alias: Tesla Low Battery — Not Plugged In
description: "Notify at 9:45pm if Tesla battery is below 50% and not charging"
mode: single
trigger:
  - platform: time
    at: "21:45:00"
condition:
  - condition: numeric_state
    entity_id: sensor.YOUR_TESLA_BATTERY_LEVEL
    below: 50
  - condition: state
    entity_id: binary_sensor.YOUR_TESLA_WALL_CONNECTOR_CONNECTED
    state: "off"
action:
  - action: notify.mobile_app_YOUR_PHONE
    data:
      title: "⚡ Tesla — Low Battery, Not Charging"
      message: >
        Tesla is at {{ states('sensor.YOUR_TESLA_BATTERY_LEVEL') }}%
        and is not plugged in. You may want to plug in before tomorrow.
      data:
        sticky: "false"
        tag: tesla_battery_low
Replace: YOUR_TESLA_BATTERY_LEVEL with your Tesla battery sensor entity (typically sensor.battery_level or similar. Check under Settings → Devices and search for your Tesla). YOUR_TESLA_WALL_CONNECTOR_CONNECTED with your Wall Connector vehicle connected binary sensor. YOUR_PHONE with your mobile app notify target.
Tip: Adjust the below: 50 threshold and the 21:45:00 time to match your charging habits.
9. Keypad Unlock Closes the Overhead Garage Door
What it does: When a Yale keypad unlock is detected on the front door, Home Assistant checks whether either garage door is open and closes it automatically.
Why it matters: When someone comes in the front door using the keypad, there is a good chance a garage door was left open. This automation closes the loop. Quite literally. One entry event, one safety check, one action.
What you need: A Yale Z-Wave lock with keypad capability connected via Z-Wave JS. A smart garage door opener with a cover entity.
yaml
alias: Keypad Unlock — Close Garage Door If Open
description: "Close the garage door when a keypad unlock is detected, if the door is open"
mode: single
trigger:
  - platform: device
    device_id: YOUR_YALE_LOCK_DEVICE_ID
    domain: zwave_js
    type: event.notification.notification
    command_class: 113
    label: "Access Control"
    event_label: "Keypad unlock operation"
condition:
  - condition: device
    device_id: YOUR_GARAGE_DOOR_DEVICE_ID
    domain: cover
    entity_id: cover.YOUR_GARAGE_DOOR
    type: is_open
action:
  - type: close
    domain: cover
    device_id: YOUR_GARAGE_DOOR_DEVICE_ID
    entity_id: cover.YOUR_GARAGE_DOOR
Replace: YOUR_YALE_LOCK_DEVICE_ID with your Yale lock’s device ID. YOUR_GARAGE_DOOR_DEVICE_ID and YOUR_GARAGE_DOOR with your garage door cover device ID and entity. If you have two garage doors, duplicate the condition and action blocks for the second door.
Note: The trigger listens for a Z-Wave Access Control notification with the Keypad unlock operation event label. This is the standard event label for Yale locks via Z-Wave JS. Confirm yours by checking Developer Tools → Events and listening for zwave_js_notification while unlocking with the keypad.
10. Nightly Lock-Up at 11pm
What it does: Every night at 11pm, Home Assistant locks all exterior doors automatically.
Why it matters: One automation, zero forgotten locks. This is the simplest version: a timed trigger that sends a lock command to every door at once. Set it, forget it, sleep soundly.
What you need: Yale or any Z-Wave smart locks connected in Home Assistant.
yaml
alias: Nightly Lock-Up at 11pm
description: "Lock all exterior doors at 11pm every night"
mode: single
trigger:
  - platform: time
    at: "23:00:00"
action:
  - action: lock.lock
    target:
      entity_id:
        - lock.YOUR_FRONT_DOOR_LOCK
        - lock.YOUR_BACK_DOOR_LOCK
        - lock.YOUR_GARAGE_MAN_DOOR_LOCK
        - lock.YOUR_SIDE_DOOR_LOCK
Replace: Add or remove lock.YOUR_DOOR_NAME entries to match your own locks. Find your lock entity IDs under Settings → Devices & Services by searching for your lock brand.
Want to know which doors actually needed locking, and get an alert if any lock fails? The advanced version of this automation tracks each lock’s state before acting, confirms success after 5 seconds, and sends a smart summary to both phones. The full version will be covered in the intermediate automations article coming soon.
What to Build Next
I hope that with these 10 simple automations, you are able to use at least a few of them, if not gain the inspiration to build something even better. If you did learn something from them or used them, please let me know back on our Facebook page or DMs. These small but mighty automations I hope help everyone and would love to hear feedback from them or ideas you have for small but mighty automations.
You may also need to add some HACS integrations to make full use of these automations or others. In that case I recommend checking out my article on the The Essential Home Assistant Add-Ons Every User Should Install.
As you start to learn more and become more comfortable, be sure to follow along on the blog and Facebook as I share more complex automations to help you dive a little deeper into the powerful world of automation. However do not forget to ensure you are always following local code, rules, and regulations based on where you live and if unsure check with your local regulations and insurance provider.
So go ahead and share these along with your ideas in the community and let me know if you found them helpful or if they inspired a whole new idea and how you built it.
Smart Home Secrets is reader-supported. We may earn a commission if you buy through our links.