📅 Published: June 2026 | ✍️ By Brad Andrews | ⏱️ 11 min read
We had our sump pump fail on us while we were out of the house, which is pretty much the worst time for that to happen because by the time you get home and find water in your basement you are already well past the point of preventing damage. We filed a claim and after that upgraded to a dual pump system with a marine backup battery so if the primary goes down the secondary kicks in.
The replacement unit that came in under warranty failed eleven months later. Same result: we were out, water came in, another claim. Two floods in under a year and honestly I wasn’t sure the insurance company was going to be great about the second one. They were, which I didn’t expect.
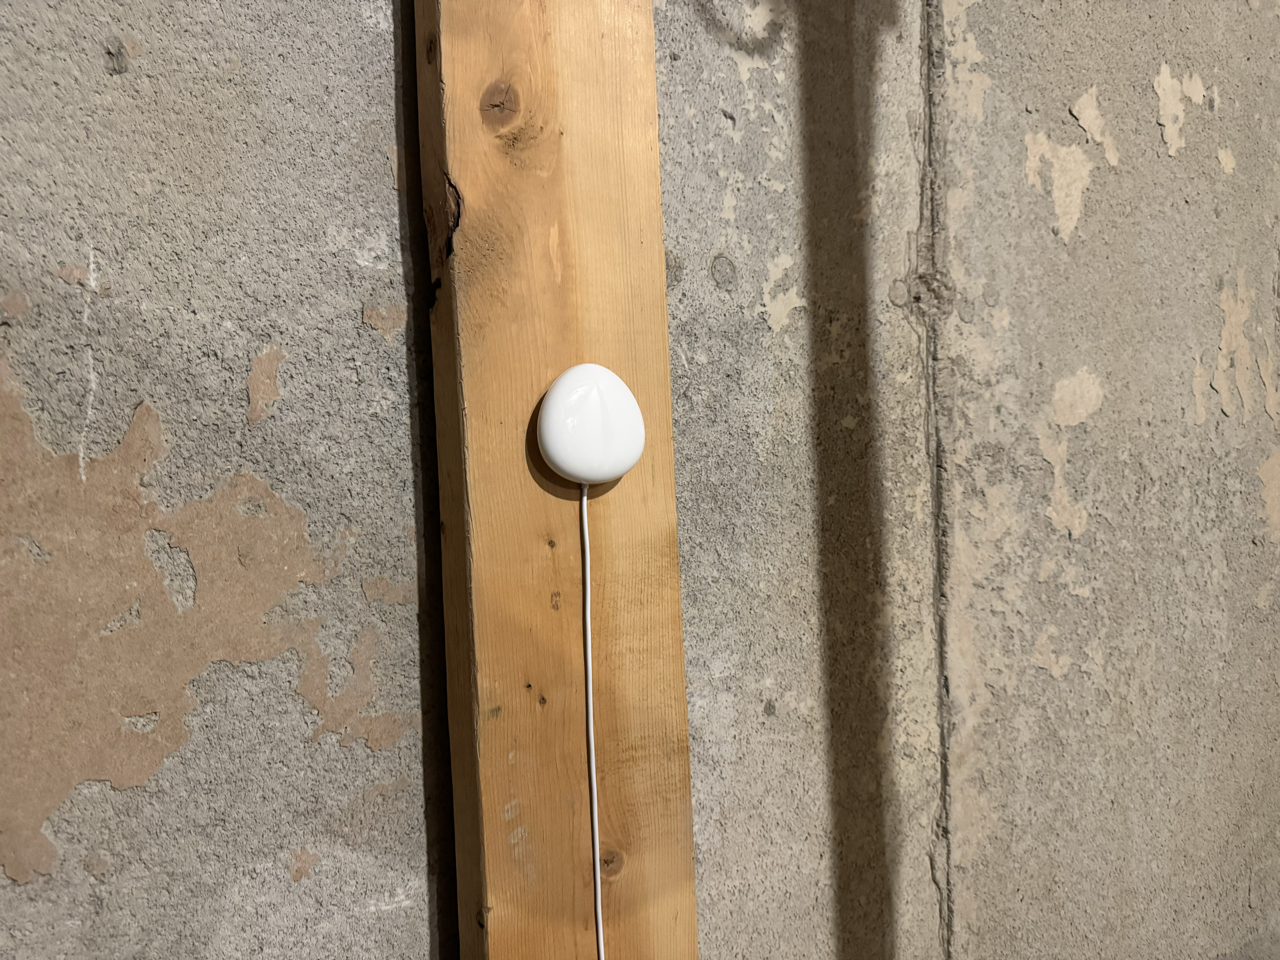
After that second one we added the Z-Wave leak sensor, placed right beside the sump pit in the cold room. The insurance company was actually happy about all of it, which I wasn’t going to argue with.
The sensor being right beside the pit is the key thing. If water starts overflowing, it hits the sensor almost immediately rather than after it’s spread across the floor and found something to soak into. That early detection is the whole point, because none of the rest of this automation matters if the sensor isn’t placed where it catches water fast.
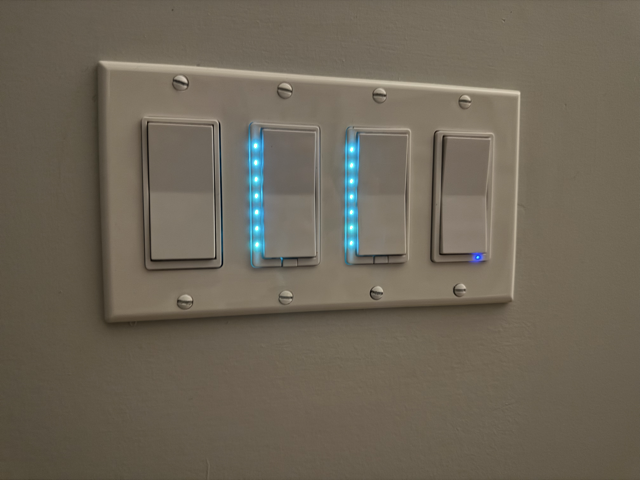
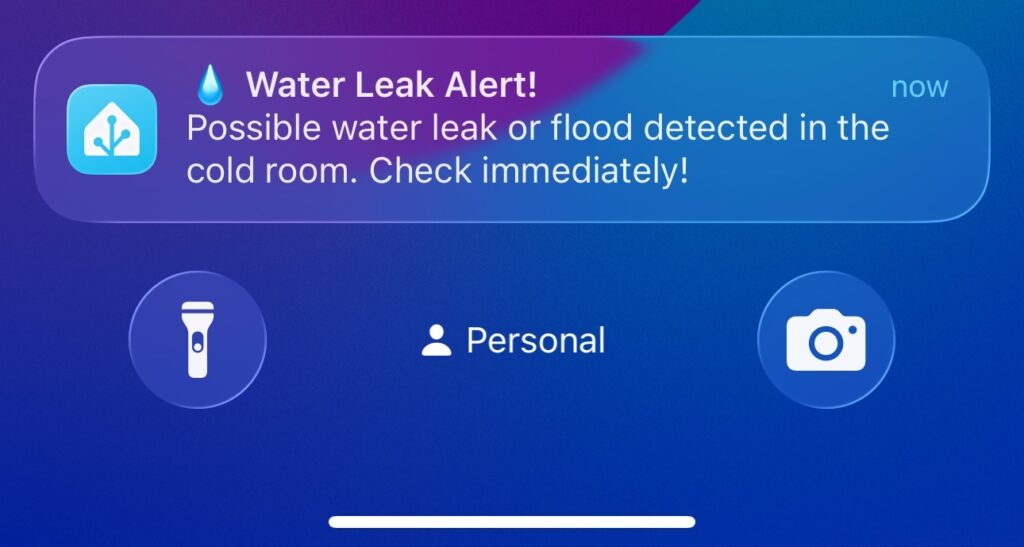
So I built home assistant water leak detection with two layers of alerting depending on where we are. If we’re home, every Z-Wave switch in the house starts flashing cyan and every LED ring on every voice satellite goes light blue. It’s hard to miss. If we’re away, both phones get a push notification with an actionable alert. And regardless of which scenario applies, nothing clears until one of us physically taps the All Clear button after checking the room.
This is the full walkthrough. Sensor choice, the alert automation, the all-clear logic, and the decisions I made along the way including a couple of things I deliberately chose not to build, and why.
What You’ll Need
A Z-Wave leak sensor. Any of these will work with everything in this article:
- HomeSeer HS-LS100+: what I’m running. Solid Z-Wave Plus sensor, exposes moisture and temperature in Home Assistant.
- Zooz 800 Series XS Sensor ZSE42: newer 800 series Z-Wave chip, great range and battery life.
- Aeotec Water Sensor 8: well-regarded option, reliable detection and good HA integration.
All three show up as a standard binary moisture sensor in Home Assistant. Pick whichever fits your Z-Wave stack or budget.
A Z-Wave controller, if you don’t have one already. I use the Home Assistant Connect ZWA-2. Plug it into your Home Assistant server and you’re running Z-Wave JS with no additional hardware needed.
For the sump pump and battery backup: skip Amazon and call a local plumbing company. You want a dual pump system with a marine backup battery properly installed, and a plumber will get you the right setup for your pit size and basement conditions. That’s not a DIY Amazon purchase kind of job, and getting it wrong is expensive.
The Sensor I’m Running
The sensor I went with is the HomeSeer HS-LS100+, which is the hardware side of my water leak detection setup. It’s Z-Wave and integrates natively into Home Assistant through Z-Wave JS. No hub, no cloud, no subscription. It shows up as a binary sensor (off for dry, on for moisture detected) and it also exposes a temperature sensor, which is a useful bonus for a cold room since I can keep an eye on whether it dips toward freezing.
It made sense to stick with HomeSeer here since I already had HS-WD200+ and HS-WS200+ switches throughout the house. Keeping the Z-Wave stack consistent is worth something. That said, any Z-Wave or Zigbee leak sensor that surfaces a binary moisture sensor in Home Assistant will work with everything in this article. Brands like Aeotec, Fibaro, and Dome all have options.
One thing worth knowing: Z-Wave leak sensors are typically battery-powered and spend most of their time in a sleep state to preserve battery life. My sensor’s node status shows asleep in HA when it’s idle. That’s normal and expected. The device wakes up and reports immediately on a moisture event, so the alert is still fast. The battery on mine has been sitting at 100% since I installed it, which, if that number is accurate, is pretty good, though Z-Wave battery reporting has a reputation for staying high and then dropping suddenly near the end.
Replace
YOUR_LEAK_SENSORwith your actual binary sensor entity ID. Find it under Settings → Devices & Services → your Z-Wave integration → the sensor device.
What Happens When Water Hits the Sensor
The alert automation triggers when the moisture sensor goes on for 5 continuous seconds. That 5-second delay filters out a single drop of condensation or a brief false positive. If moisture is present for 5 seconds, something is actually wrong.
Here’s what fires in sequence:
1. LED ring snapshots saved Before changing anything, the automation saves the current colour and brightness of all three voice satellite LED rings to input_text helpers. This way when the alert clears, everything restores to exactly what it was before.
2. Every wall switch in the house starts flashing cyan This is the part that I think makes the most sense for a water leak, and it took some thought to land on. I have 29 Z-Wave wall switches across the house, a mix of Inovelli VZW31-SN dimmers, HomeSeer HS-WD200+ dimmers, and HomeSeer HS-WS200+ switches. They all support LED status effects through Z-Wave parameters.
Cyan is the colour I use specifically for water alerts. Nothing else in my setup uses cyan, so there’s no ambiguity. When you walk into a room and every switch is flashing cyan, you know immediately something is wrong.
3. Voice satellite LED rings go light blue The HA Voice PE units and the FutureProofHomes Satellite1 all have LED rings that I use for status signalling. During a leak alert they go solid light blue at full brightness. It’s different enough from the cyan flash on the switches to be visible without being redundant.
4. Push notifications go to both phones Both Kelly’s phone and mine get a notification with an actionable button: All Clear. The notification stays on the phone until one of us dismisses it or taps All Clear.
The Alert Automation YAML
A few notes before you paste this in. Everything in ALL_CAPS is a placeholder. Replace each one with your actual entity ID before saving the automation.
This automation is split into three device groups because the Inovelli VZW31-SN switches use a completely different Z-Wave parameter structure than the HomeSeer WD200+ and WS200+ switches. If you only have one switch type, you can remove the irrelevant groups.
yaml
alias: Water Leak - Alert
description: >
  Triggers when YOUR_LEAK_SENSOR detects moisture for 5 seconds.
  Saves LED ring snapshots, sets all wall switches to blinking cyan,
  sets VA and Speaker LED rings to light blue, and sends actionable
  notifications to both phones.
mode: single
trigger:
  - platform: state
    entity_id: binary_sensor.YOUR_LEAK_SENSOR_water_leak_detected
    to: "on"
    for:
      seconds: 5
conditions: []
actions:
  # --- Save LED ring snapshots before overriding them ---
  - alias: Save Office VA LED snapshot
    action: input_text.set_value
    target:
      entity_id: input_text.YOUR_OFFICE_VA_LED_SNAPSHOT
    data:
      value: >
        {% set s = states('light.YOUR_OFFICE_VA_LED_RING') %}
        {% set rgb = state_attr('light.YOUR_OFFICE_VA_LED_RING', 'rgb_color') %}
        {% set bri = state_attr('light.YOUR_OFFICE_VA_LED_RING', 'brightness') %}
        {{ {'state': s, 'r': (rgb or [0,0,0])[0], 'g': (rgb or [0,0,0])[1],
            'b': (rgb or [0,0,0])[2], 'brightness': bri | int(0)} | to_json }}

  - alias: Save Bedroom VA LED snapshot
    action: input_text.set_value
    target:
      entity_id: input_text.YOUR_BEDROOM_VA_LED_SNAPSHOT
    data:
      value: >
        {% set s = states('light.YOUR_BEDROOM_VA_LED_RING') %}
        {% set rgb = state_attr('light.YOUR_BEDROOM_VA_LED_RING', 'rgb_color') %}
        {% set bri = state_attr('light.YOUR_BEDROOM_VA_LED_RING', 'brightness') %}
        {{ {'state': s, 'r': (rgb or [0,0,0])[0], 'g': (rgb or [0,0,0])[1],
            'b': (rgb or [0,0,0])[2], 'brightness': bri | int(0)} | to_json }}

  # --- Inovelli VZW31-SN switches: set fast-blink cyan ---
  # Parameter 99 controls the LED notification effect.
  # property_key 16711680 = colour (127 = cyan)
  # property_key 65280    = level/brightness (100 = full)
  # property_key 255      = duration (255 = forever)
  # property_key 4278190080 = effect (3 = fast blink)
  - alias: Inovelli — Set Colour (Cyan)
    action: zwave_js.set_value
    data:
      command_class: 112
      property: 99
      property_key: 16711680
      value: 127
      device_id:
        - YOUR_INOVELLI_DEVICE_ID_1
        - YOUR_INOVELLI_DEVICE_ID_2
        # Add all your Inovelli device IDs here

  - alias: Inovelli — Set Level (100%)
    action: zwave_js.set_value
    data:
      command_class: 112
      property: 99
      property_key: 65280
      value: 100
      device_id:
        - YOUR_INOVELLI_DEVICE_ID_1
        - YOUR_INOVELLI_DEVICE_ID_2

  - alias: Inovelli — Set Duration (Forever)
    action: zwave_js.set_value
    data:
      command_class: 112
      property: 99
      property_key: 255
      value: 255
      device_id:
        - YOUR_INOVELLI_DEVICE_ID_1
        - YOUR_INOVELLI_DEVICE_ID_2

  - alias: Inovelli — Set Effect (Fast Blink)
    action: zwave_js.set_value
    data:
      command_class: 112
      property: 99
      property_key: 4278190080
      value: 3
      device_id:
        - YOUR_INOVELLI_DEVICE_ID_1
        - YOUR_INOVELLI_DEVICE_ID_2

  - delay:
      seconds: 1
    alias: Delay to drain Z-Wave queue after Inovelli group

  # --- HomeSeer HS-WD200+ dimmers: enable status mode and set cyan ---
  # Property 13 = status mode (1 = on, 0 = off)
  # Properties 21-27 = LED segments 1-7 (value 6 = cyan)
  - alias: HomeSeer WD200+ — Enable Status Mode
    action: zwave_js.set_value
    data:
      command_class: 112
      property: 13
      value: 1
      device_id:
        - YOUR_WD200_DEVICE_ID_1
        - YOUR_WD200_DEVICE_ID_2
        # Add all your HS-WD200+ device IDs here

  - alias: HomeSeer WD200+ — Set All 7 LEDs Cyan
    action: zwave_js.set_value
    data:
      command_class: 112
      property: 21
      value: 6
      device_id:
        - YOUR_WD200_DEVICE_ID_1
        - YOUR_WD200_DEVICE_ID_2
  # Repeat for properties 22, 23, 24, 25, 26, 27 (segments 2-7)
  # Each property = one LED segment on the WD200+ bar

  - delay:
      seconds: 1
    alias: Delay to drain Z-Wave queue after WD200+ group

  # --- HomeSeer HS-WS200+ switches: enable status mode and set cyan ---
  # Property 13 = status mode (1 = on)
  # Property 21 = LED colour (value 3 = cyan on WS200+)
  - alias: HomeSeer WS200+ — Enable Status Mode
    action: zwave_js.set_value
    data:
      command_class: 112
      property: 13
      value: 1
      device_id:
        - YOUR_WS200_DEVICE_ID_1
        - YOUR_WS200_DEVICE_ID_2
        # Add all your HS-WS200+ device IDs here

  - alias: HomeSeer WS200+ — Set LED Cyan
    action: zwave_js.set_value
    data:
      command_class: 112
      property: 21
      value: 3
      device_id:
        - YOUR_WS200_DEVICE_ID_1
        - YOUR_WS200_DEVICE_ID_2

  # --- Voice satellite LED rings ---
  - alias: LED Rings — Set light blue
    action: light.turn_on
    target:
      entity_id:
        - light.YOUR_OFFICE_VA_LED_RING
        - light.YOUR_BEDROOM_VA_LED_RING
    data:
      rgb_color: [0, 200, 255]
      brightness: 255

  # --- Notifications ---
  - alias: Notify — Your phone
    action: notify.mobile_app_YOUR_PHONE
    data:
      title: "💧 Water Leak Alert!"
      message: "Possible water leak detected. Check immediately!"
      data:
        actions:
          - action: LEAK_ALL_CLEAR
            title: "✅ All Clear"

  - alias: Notify — Spouse phone
    action: notify.mobile_app_SPOUSE_PHONE
    data:
      title: "💧 Water Leak Alert!"
      message: "Possible water leak detected. Check immediately!"
      data:
        actions:
          - action: LEAK_ALL_CLEAR
            title: "✅ All Clear"
Helpers you need to create before this automation will save:
Go to Settings → Devices & Services → Helpers → Create Helper → Text for each of these:
input_text.YOUR_OFFICE_VA_LED_SNAPSHOTinput_text.YOUR_BEDROOM_VA_LED_SNAPSHOT
These just store the LED state as a JSON string. They don’t need any special settings beyond the default.
Finding your Z-Wave device IDs:
The Inovelli, WD200+, and WS200+ actions above use device_id rather than entity_id. To find your device IDs, go to Settings → Devices & Services → Z-Wave JS → your switch device → click the device name → look at the URL. The long string at the end is the device ID.
Why We Chose Not to Add TTS Announcements
The honest answer is timing. Our kids still end up in our bed regularly enough that a loud alert at 2am announcing a water leak is going to wake everyone up for what might turn out to be a false positive. Once they’re older and reliably in their own beds, I’ll add a bedroom Sonos announcement from 9pm to 7am so we’d be woken up if the sensor triggers overnight. For now the phone notification is enough coverage and avoids the 2am family chaos scenario.
Here’s how to add it when the time is right for your setup:
yaml
  # Optional: Bedroom speaker TTS between 9pm and 7am
  - alias: Optional — Bedroom TTS if nighttime
    condition: time
    after: "21:00:00"
    before: "07:00:00"
  - action: tts.speak
    data:
      message: "Water leak alert. Check the basement immediately."
      media_player_entity_id: media_player.YOUR_BEDROOM_SPEAKER
    target:
      entity_id: tts.home_assistant_cloud
Drop that block into the actions section above the notification steps if you want it. The condition before the tts.speak means the announcement only fires during those hours and the phone notifications still go out regardless.
The All Clear Automation
This is the part that I think is easy to get wrong if you set it up automatically.
My first instinct was to clear the alert when the sensor goes back to off. But that creates a problem: the sensor could clear before you’ve actually dealt with the water. A wet floor dries. A small drip might stop on its own. You want a human to physically check the room and confirm everything is okay before the visual alert disappears.
So the All Clear is triggered only by the button in the notification. Either phone can tap it. When they do, this automation fires:
yaml
alias: Water Leak - All Clear
description: >
  Triggered when the LEAK_ALL_CLEAR notification action is tapped.
  Clears all LED effects on wall switches and restores VA/Speaker
  LED rings from their pre-alert snapshots.
mode: single
trigger:
  - platform: event
    event_type: mobile_app_notification_action
    event_data:
      action: LEAK_ALL_CLEAR
conditions: []
actions:
  # --- Clear Inovelli LED effects ---
  # Setting all four parameter bytes to 0 clears the effect completely
  - alias: Inovelli — Clear Effect byte
    action: zwave_js.set_value
    data:
      command_class: 112
      property: 99
      property_key: 4278190080
      value: 0
      device_id:
        - YOUR_INOVELLI_DEVICE_ID_1
        - YOUR_INOVELLI_DEVICE_ID_2

  - alias: Inovelli — Clear Colour byte
    action: zwave_js.set_value
    data:
      command_class: 112
      property: 99
      property_key: 16711680
      value: 0
      device_id:
        - YOUR_INOVELLI_DEVICE_ID_1
        - YOUR_INOVELLI_DEVICE_ID_2

  - alias: Inovelli — Clear Level byte
    action: zwave_js.set_value
    data:
      command_class: 112
      property: 99
      property_key: 65280
      value: 0
      device_id:
        - YOUR_INOVELLI_DEVICE_ID_1
        - YOUR_INOVELLI_DEVICE_ID_2

  - alias: Inovelli — Clear Duration byte
    action: zwave_js.set_value
    data:
      command_class: 112
      property: 99
      property_key: 255
      value: 0
      device_id:
        - YOUR_INOVELLI_DEVICE_ID_1
        - YOUR_INOVELLI_DEVICE_ID_2

  # --- Disable status mode on HomeSeer switches ---
  - alias: HomeSeer WD200+ — Disable Status Mode
    action: zwave_js.set_value
    data:
      command_class: 112
      property: 13
      value: 0
      device_id:
        - YOUR_WD200_DEVICE_ID_1
        - YOUR_WD200_DEVICE_ID_2

  - alias: HomeSeer WS200+ — Disable Status Mode
    action: zwave_js.set_value
    data:
      command_class: 112
      property: 13
      value: 0
      device_id:
        - YOUR_WS200_DEVICE_ID_1
        - YOUR_WS200_DEVICE_ID_2

  # --- Restore LED rings from snapshots ---
  - alias: Restore Office VA LED Ring
    choose:
      - conditions:
          - condition: template
            value_template: >
              {{ (states('input_text.YOUR_OFFICE_VA_LED_SNAPSHOT') | from_json).state == 'on' }}
        sequence:
          - action: light.turn_on
            data:
              brightness: >
                {{ (states('input_text.YOUR_OFFICE_VA_LED_SNAPSHOT') | from_json).brightness | int }}
              rgb_color:
                - >
                  {{ (states('input_text.YOUR_OFFICE_VA_LED_SNAPSHOT') | from_json).r | int }}
                - >
                  {{ (states('input_text.YOUR_OFFICE_VA_LED_SNAPSHOT') | from_json).g | int }}
                - >
                  {{ (states('input_text.YOUR_OFFICE_VA_LED_SNAPSHOT') | from_json).b | int }}
            target:
              entity_id: light.YOUR_OFFICE_VA_LED_RING
    default:
      - action: light.turn_off
        target:
          entity_id: light.YOUR_OFFICE_VA_LED_RING

  - alias: Restore Bedroom VA LED Ring
    choose:
      - conditions:
          - condition: template
            value_template: >
              {{ (states('input_text.YOUR_BEDROOM_VA_LED_SNAPSHOT') | from_json).state == 'on' }}
        sequence:
          - action: light.turn_on
            data:
              brightness: >
                {{ (states('input_text.YOUR_BEDROOM_VA_LED_SNAPSHOT') | from_json).brightness | int }}
              rgb_color:
                - >
                  {{ (states('input_text.YOUR_BEDROOM_VA_LED_SNAPSHOT') | from_json).r | int }}
                - >
                  {{ (states('input_text.YOUR_BEDROOM_VA_LED_SNAPSHOT') | from_json).g | int }}
                - >
                  {{ (states('input_text.YOUR_BEDROOM_VA_LED_SNAPSHOT') | from_json).b | int }}
            target:
              entity_id: light.YOUR_BEDROOM_VA_LED_RING
    default:
      - action: light.turn_off
        target:
          entity_id: light.YOUR_BEDROOM_VA_LED_RING
Why the snapshot-and-restore pattern?
The LED rings on my HA Voice PE units show status information from other automations. Package delivery, away mode, bedtime reminders: all of those can set the LED ring to a specific colour. If the leak alert just turns the rings off when it clears, it wipes that context. The snapshot saves whatever the rings were showing before the alert fired, and the restore brings them back to exactly that state.
The choose block handles the off case. If the ring was off when the alert triggered, the snapshot stores state: off, the condition evaluates false, and the default path runs light.turn_off instead of trying to turn it on with saved RGB values that don’t exist.
The “Show It on the TV” Option
If you want to take the alerts further, you could also push a warning image or camera feed to a screen in the house. Home Assistant can navigate a Fully Kiosk tablet to a specific dashboard view, or push a URL to an Apple TV using media_player.play_media.
I didn’t build this, and the reason is simple: if we’re both out of the house, there’s nobody watching the TV. And if we’re home, the flashing switches are going to be visible in whatever room we’re in before we’d ever look at a TV. The phone notification covers both cases.
But if you want to add it, here’s how to push a warning dashboard to a Fully Kiosk tablet:
yaml
  # Optional: Push warning view to kitchen tablet (Fully Kiosk)
  - action: fully_kiosk.load_url
    data:
      url: "http://YOUR_HA_URL:8123/YOUR_ALERT_DASHBOARD_PATH"
    target:
      device_id: YOUR_FULLY_KIOSK_DEVICE_ID
You’d need a dedicated dashboard in HA with a warning card or camera feed, and the Fully Kiosk Browser integration installed. The tablet will navigate to that view when the alert fires and stays there until you navigate away. Add a matching load_url action in the All Clear automation to return it to its normal dashboard.
For Apple TV, the native media_player.play_media can display an image URL but the behaviour varies by tvOS version and what’s currently playing. I’d test it on your specific setup before relying on it.
One More Thing: Passive Monitoring on Every Motion Sensor
This is something I built separately but it’s worth mentioning here because it uses the same leak sensor entity. My HSM200 multi-sensors in the office, at the basement stairs, and on the landing each flash a three-colour sequence when they detect motion. The third flash colour represents cold room leak status: green for clear, red for active, yellow if the sensor is unavailable.
It’s not an alert in the traditional sense. But it means any time I walk past one of those sensors, I get a silent ambient check on the leak sensor state. I’ve been running this for a while now and I genuinely do glance at that third flash colour without thinking about it anymore. It becomes background awareness rather than active monitoring, which is all you really need most of the time.
That automation is covered in more detail in the Inovelli LED bar automations article if you want to build the same thing.
Where to Put Sensors
The cold room is where the sump pump lives in our house, so that’s where the sensor went. Right on the floor next to the pit. The logic is simple: if water overflows the pit, that sensor is the first thing it hits. You want the sensor as close to the failure point as possible, not somewhere it might catch water after it’s already spread.
If your sump pump is in a utility room or mechanical room rather than a cold room, same idea: sensor goes right beside the pit.
Beyond the sump, worth thinking about for your own setup: around the water heater and any pressure tanks, under sinks where supply lines connect, behind the washing machine, and near any floor drain that could back up.
Each sensor adds another Z-Wave device and another battery to track. My cold room sensor has been at 100% since I installed it, which, if that reading is accurate, is pretty good, though Z-Wave battery reporting has a reputation for staying high and then dropping fast near the end. Tie it into a battery health automation and you won’t be caught off guard. I have one that runs every Sunday morning and sends a report if anything drops below 20%.
What’s Next in the Safety Series
Water leak detection in Home Assistant is one piece of a broader safety picture. There are a few other things in a house that matter just as much when they go wrong.
Coming up in this series: smoke and CO detection, and how to wire hardwired detectors into Home Assistant without replacing them with something that requires a cloud account. That one’s been on my list for a while and involves a bit more research than a leak sensor, but it’s coming.
If you’re building this out and want to share what you ended up with, our Facebook page is the best place to do it. I’d genuinely like to see what variations people come up with on the TV display and TTS options especially. And if the YAML patterns here are new territory, the easy automations and intermediate automations articles are a good place to get comfortable with how Home Assistant automation logic works before diving into something this involved.
Smart Home Secrets is reader-supported. We may earn a commission if you buy through our links.